#1.
What are wireframes?
A wireframe is a diagram or plan of your future digital solution, such as a mobile or web application.
This first design does not represent your final application as such; it is a simplified version of your user interface.
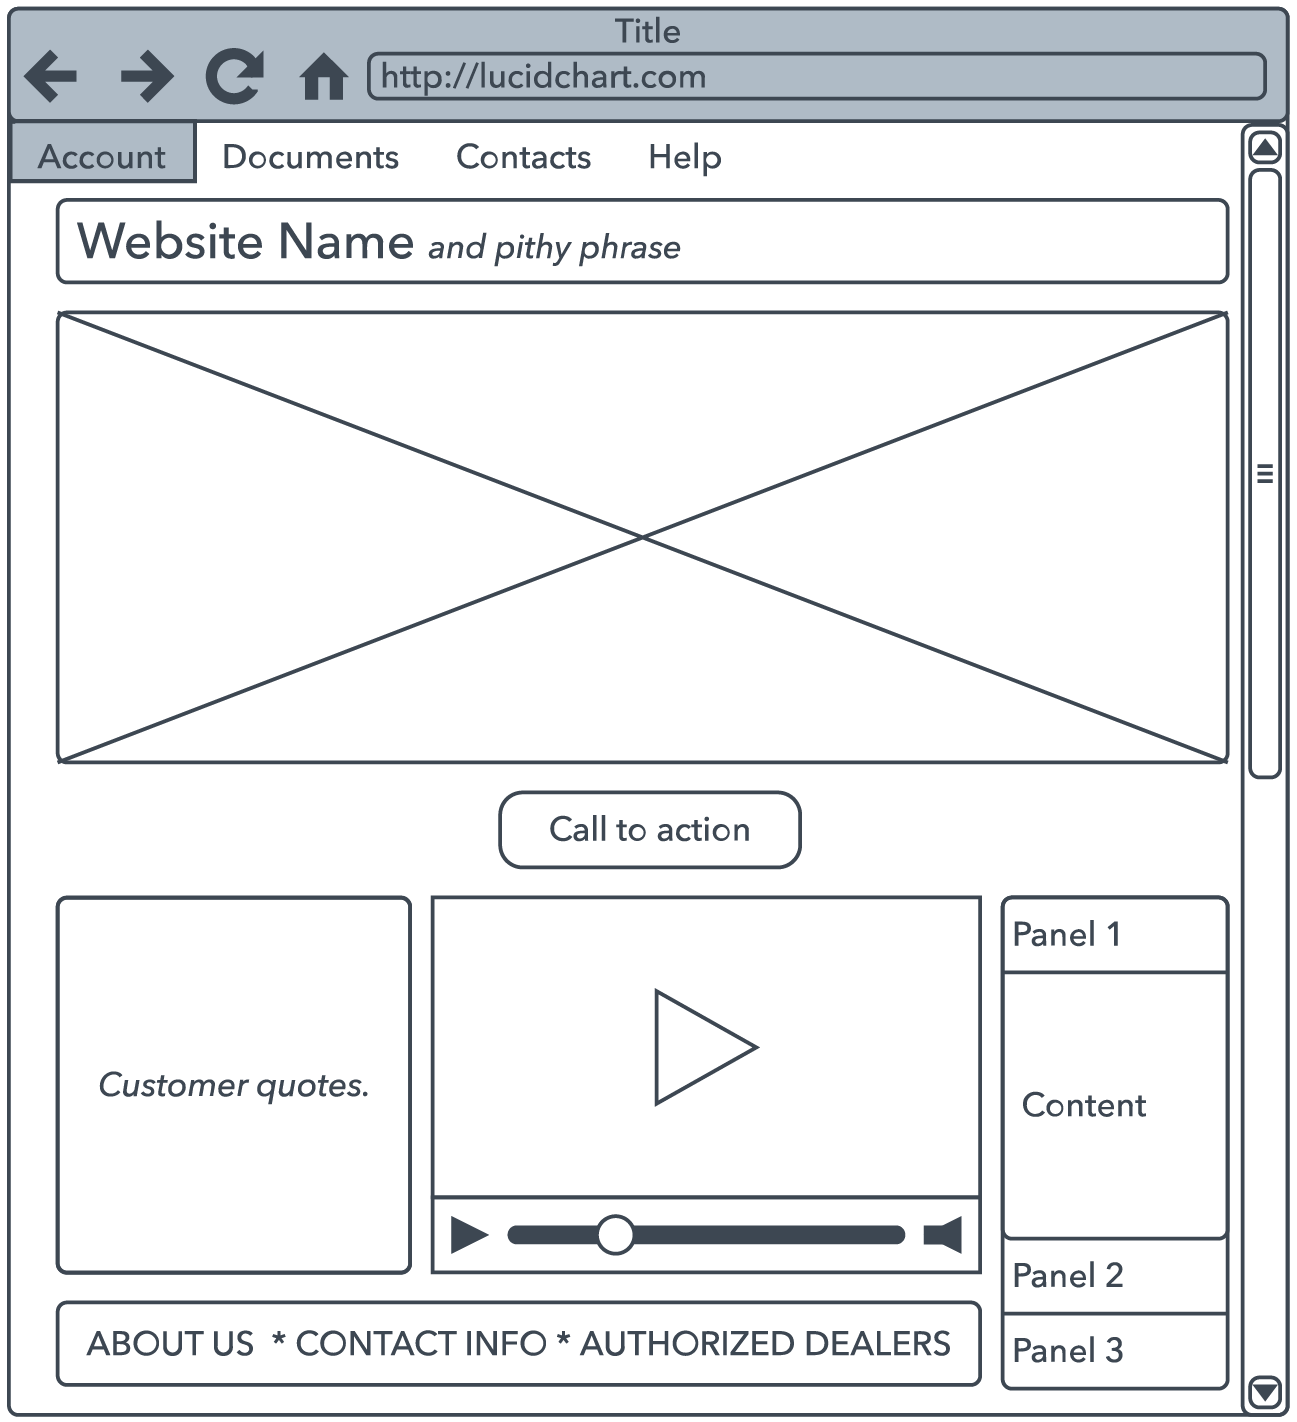
Here is an example of a wireframe from the Balsamiq website:

This phase should be carried out before development.
A wireframe helps you visualise your project more clearly: the general organisation of the information, the architecture, the layout of the pages, the text zones, the graphic elements such as photos and videos, and so on.
The idea is to place all the elements on it that you would like to see on your future pages.
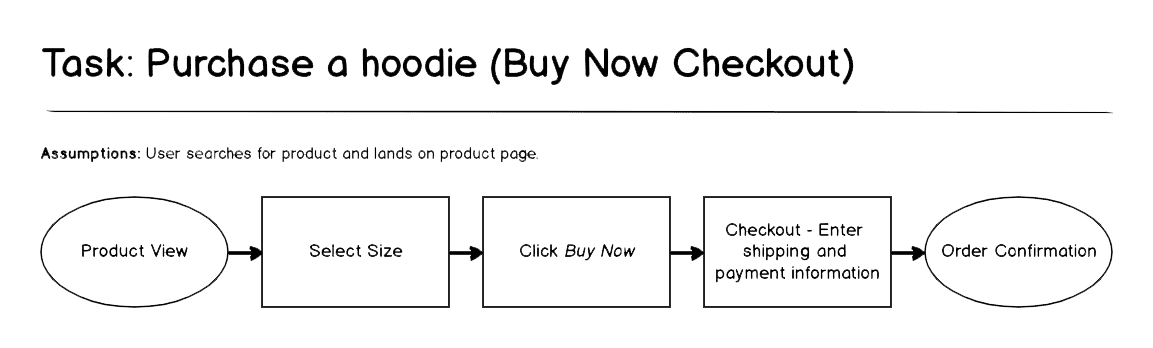
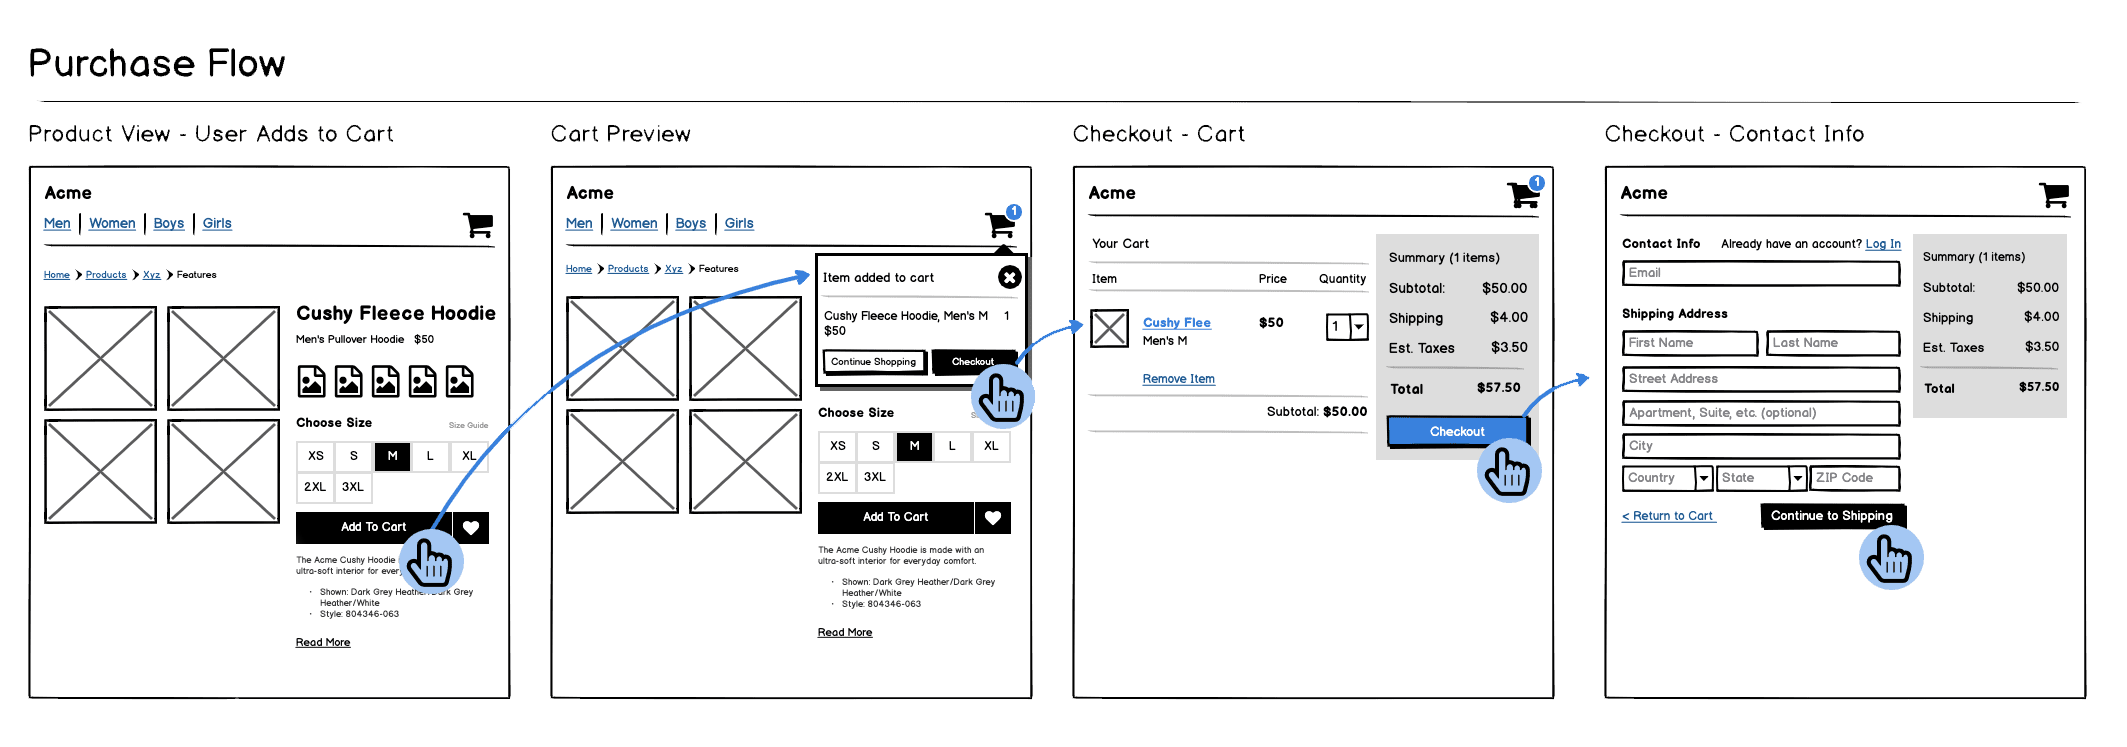
A wireframe is also used to define the connection between the different parts of your solution: what paths will the user be able to take once they are on your application?
Wireframes contain no real 'design elements'. They are simple, easy-to-create diagrams.
You can compare a wireframe to the first plan you make when you build a house. It is not the final plan of the house, but it represents an idea of what it might look like.
#2.
Why make wireframes?
Creating wireframes is one of the first steps in the development of your project.
It is an important stage because it validates the concept of your project and assumptions about the interface and user experience.
Creating wireframes teaches you how to prioritise information about your application and structure your ideas appropriately.
Wireframes give you an easy-to-use solution: they allow you to think about your project as a whole in a simplified way.
By laying the groundwork before you develop your application, it won't become unnecessarily complex.
Note here that if your wireframes are not understood by everyone, that means your final application won't be either.
To help you with this, you can use the KISS principle, "Keep it Simple, Stupid", which means that it is best to favour simplicity and avoid unnecessary complexity.
Drawing wireframes also helps convey the right messages.
Wireframes facilitate communication between you, your project manager and both internal and external developers.
This phase helps you determine the duration - and therefore the cost - of your project. Your project manager can estimate which pages will take the most time and which are easier to develop.
This phase will save you a lot of time during the final development phase of your project.
#3.
How to create a wireframe?
Several points to keep in mind when creating your wireframes:
This is not the final stage: don't focus too much on details but concentrate on the essential elements of your project, its structure.
If you include too many details, you risk hindering your developers for the continuation of the project; they won't have enough flexibility for the development phase.
The purpose of a wireframe is to initiate discussion: express your opinion and don't hesitate to ask for new wireframes; this is quickly achievable and allows you to obtain the ideal solution.
Remember that a wireframe is created before development and therefore does not require any code.
We recommend creating your wireframes as a team to have different perspectives, exchange ideas, and challenge your concepts to arrive at the best possible solution.
Feel free to draw inspiration from what already exists and works well. There's no need to reinvent the wheel.
Note that drawing inspiration doesn't mean simply 'copying'; it must of course apply to your project.
List the pages in order of importance so you know on which pages to focus the most effort.
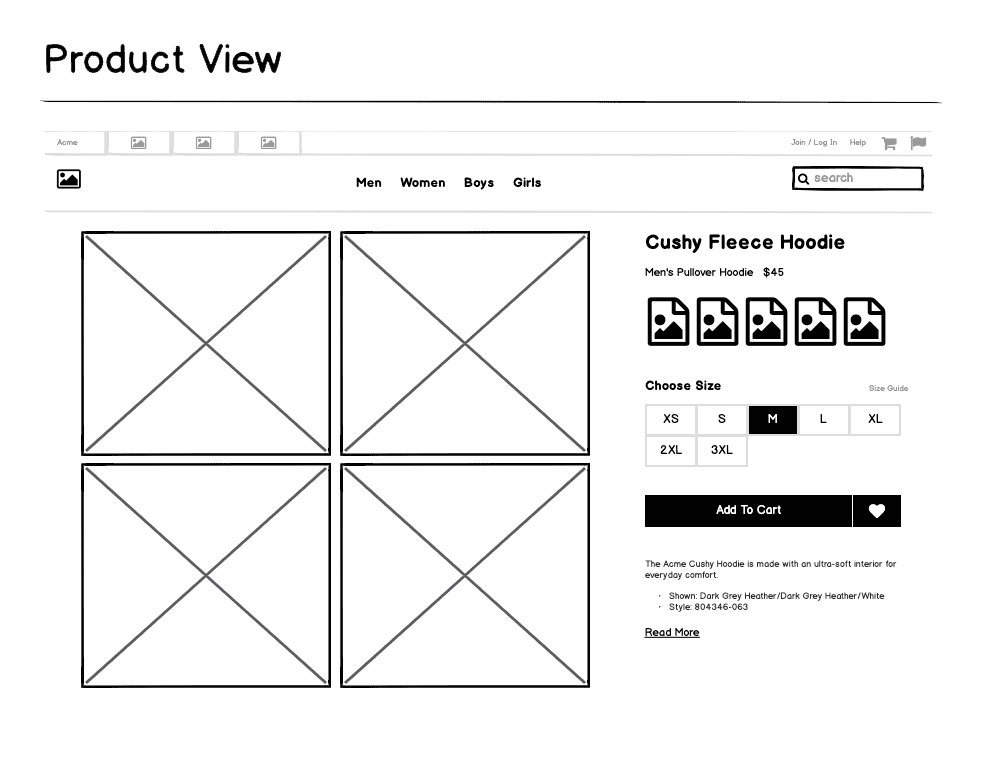
Try to respect the size of the elements (headings, text blocks, photos, CTAs, social media buttons, etc.) to get an idea of their importance.
If you already have content, you can include it in your wireframes to get a more concrete idea of the appearance of your application.
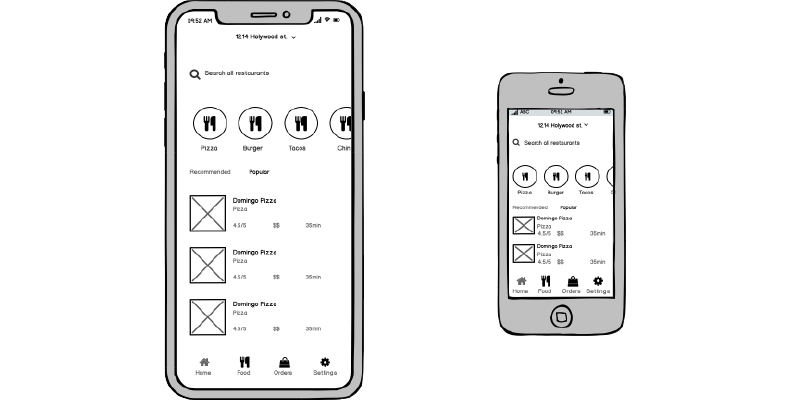
If you have a project for a web application, don't forget the mobile version; these are very different screens. Also, keep in mind that not all smartphones have the same dimensions, as you can see in the illustration on the Balsamiq website above.
The elements you should include in a wireframe:
Place the important elements you want to see in your application:
- Limit the major zones: header - body - footer
- Text areas with titles
- Blocks of photos/videos/icons
- The menu and possibly submenus if you already have them
- Buttons for social media
- The search bar
- Call-to-action buttons
- ...
Remember that there is no design; for example, you can draw a rectangle with a cross for photos, a line for text, and so on. Everything should be simple and schematic.
Also, consider the navigation route: on which page does a user land when clicking a button?
When to create a wireframe?
A wireframe is created before the development of your project, but you can create them at various points during your thought process.
At Deuse, the timing of the wireframe depends on the client and the project.
For some, we create wireframes after the first meeting between the client and our project manager. In fact, it's the latter who draws them.
For others, we create them later, just before diving into the design of the digital solution, to guide our designers in the right direction.
Some clients have no idea what they want; they only have a general idea of their project. This phase is then all the more important. We create wireframes that we discuss with them, and based on their feedback and our discussions, we create new ones. These diagrams help them structure their project.
If you have no clue how to structure your project, we recommend creating your wireframes at the beginning of your considerations. They will genuinely help you see the overall picture.
#4.
What tools should I use to create wireframes?
There are various techniques for creating wireframes; here are a few:
By hand:
You can simply draw your wireframes by hand. As explained earlier, there is no design element; a sheet of paper and a pencil are sufficient to put your ideas on paper.
You can also start by sketching some diagrams by hand and then switch to another solution described below to further develop your wireframes.
Graphic software:
If you are proficient in graphic software such as Illustrator or Photoshop from the Adobe suite, or even the Paint program, you can easily create wireframes by manually creating each element.
You start with a blank page, which can be a challenge if you lack inspiration.
Online tools:
There are numerous websites and software that allow you to create wireframes by offering ready-made templates and elements that can be easily placed on your layout (usually in the form of drag & drop).
Here are some interesting sites (some are free, and others are paid): Balsamiq, Figma, Moqups, Mockplus, Invision, Axure,...
The solution used by Deuse:
We create some wireframes by hand, and for others, we use Lucidchart, a collaborative platform that allows you to quickly create wireframes and various types of data visualizations.
A free version is available that allows you to manage 3 projects. Given that we create a lot of wireframes for our clients, we opted for a paid version (for less than 10€ a month, Lucidchart already offers many features).
We use this solution because it is very intuitive, allows us to work as a team and collect all our wireframes on one platform.
#5.
How do you create wireframes for a web application?
To understand how wireframes are created, let us walk you through all the steps we at Deuse take when creating wireframes for a website using Lucidchart. In the next chapter, we will showcase our approach for a mobile application.
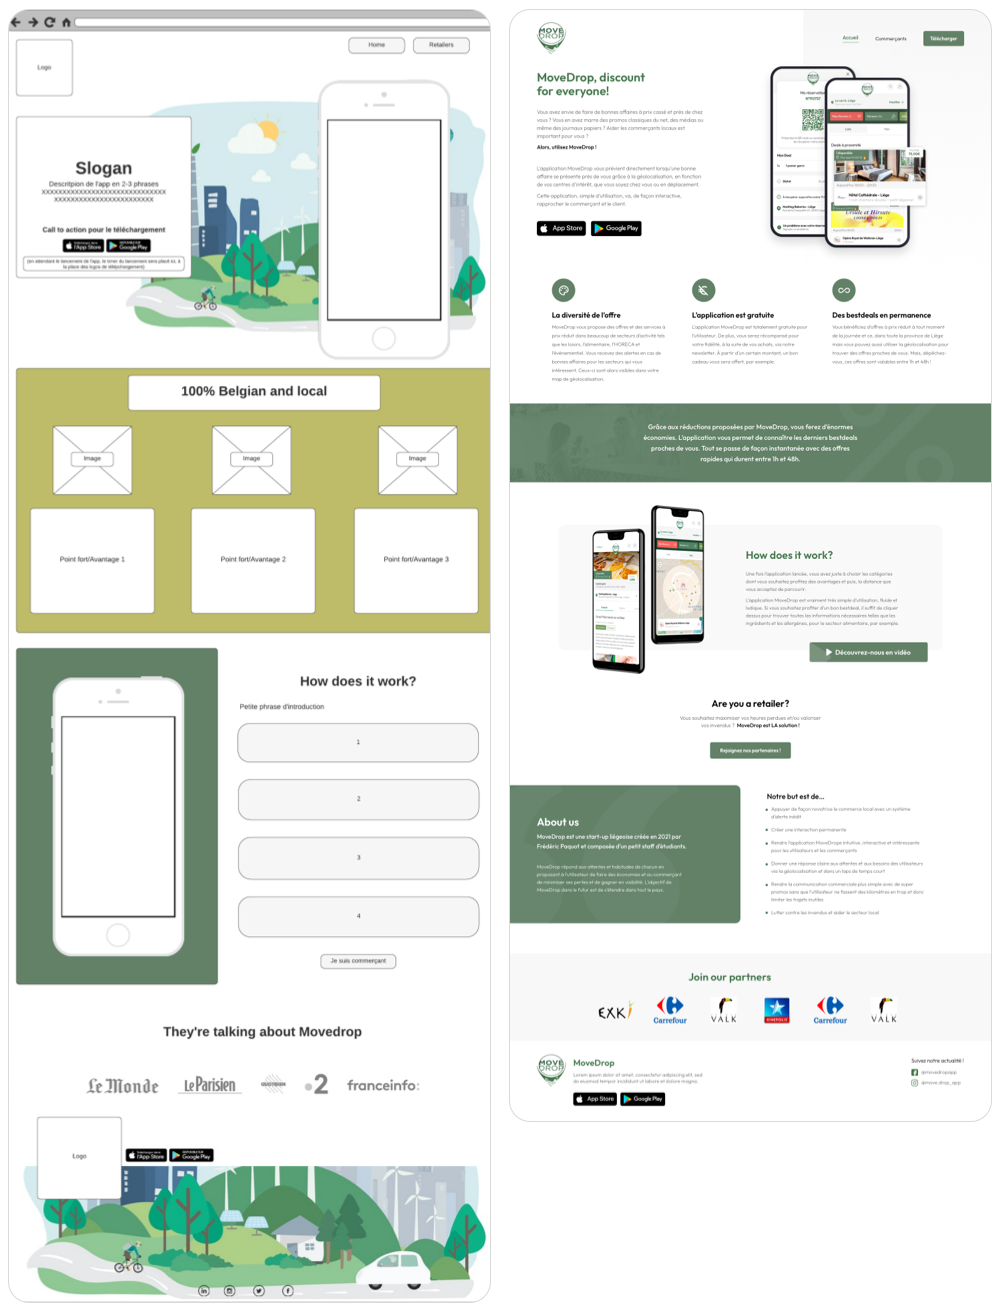
For setting up wireframes for a website, let's take the example of the Movedrop project:
This is a small showcase website with 2 pages, intended to highlight the project and its main tool, the Movedrop mobile application, and provide information.
This mobile application connects users with local merchants, enabling merchants to offer deals on their unsold products, and allowing customers to take advantage of these deals.
Practically, merchants with unsold products can create an account on the Movedrop mobile application to sell these products by publishing deals on their profile. Customers who want to participate in an initiative supporting unsold products and local trade can also create an account to access these deals.
The website does not have any specific functionalities, but its design and structure are crucial as it reflects the mobile application on the web. It also serves as an information and marketing tool. It needs to be well-constructed to quickly and efficiently meet the information needs of the public and convince future users.
To help our client get an idea of the website's appearance and the information they need to provide (texts, images), it is important to create a wireframe before the design phase.
This wireframe then allows the designer to get an idea of the desired look and the content to be included in the design.
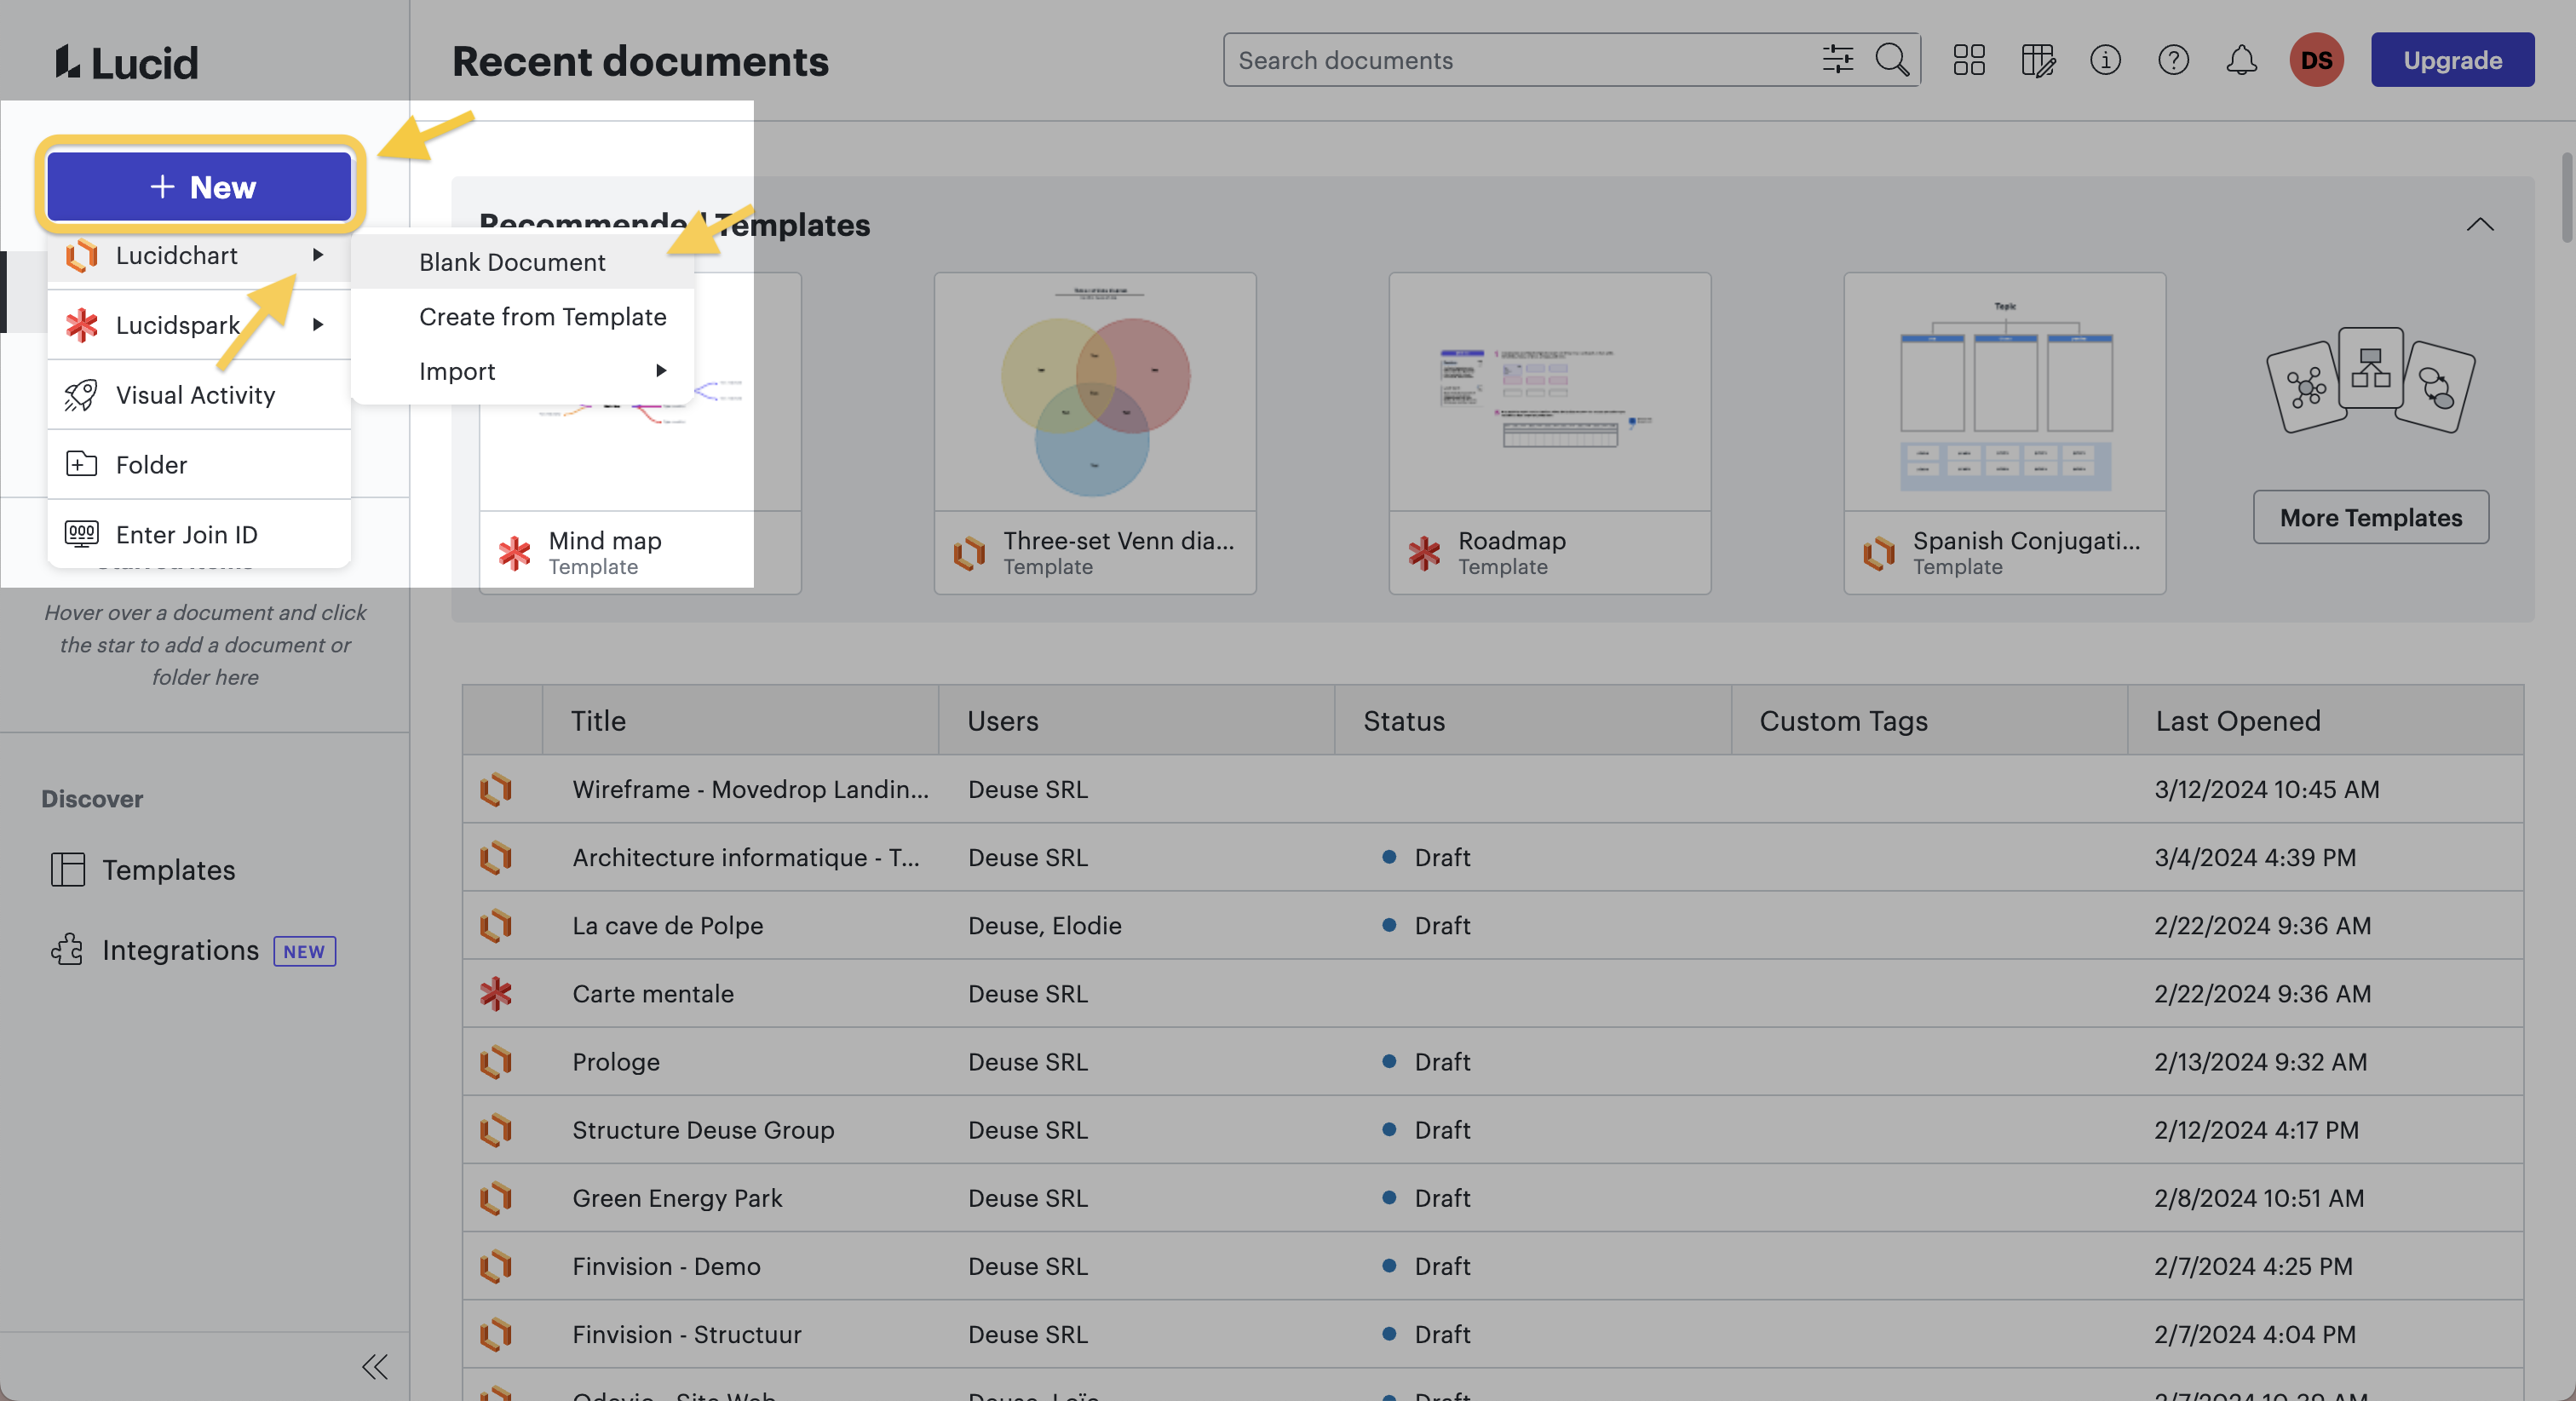
Step 1: Creating a new project on Lucidchart
After logging into our account, we create a new document, which will become the "Movedrop - Website" project. For creating this new wireframe, we select a blank Lucidchart document.

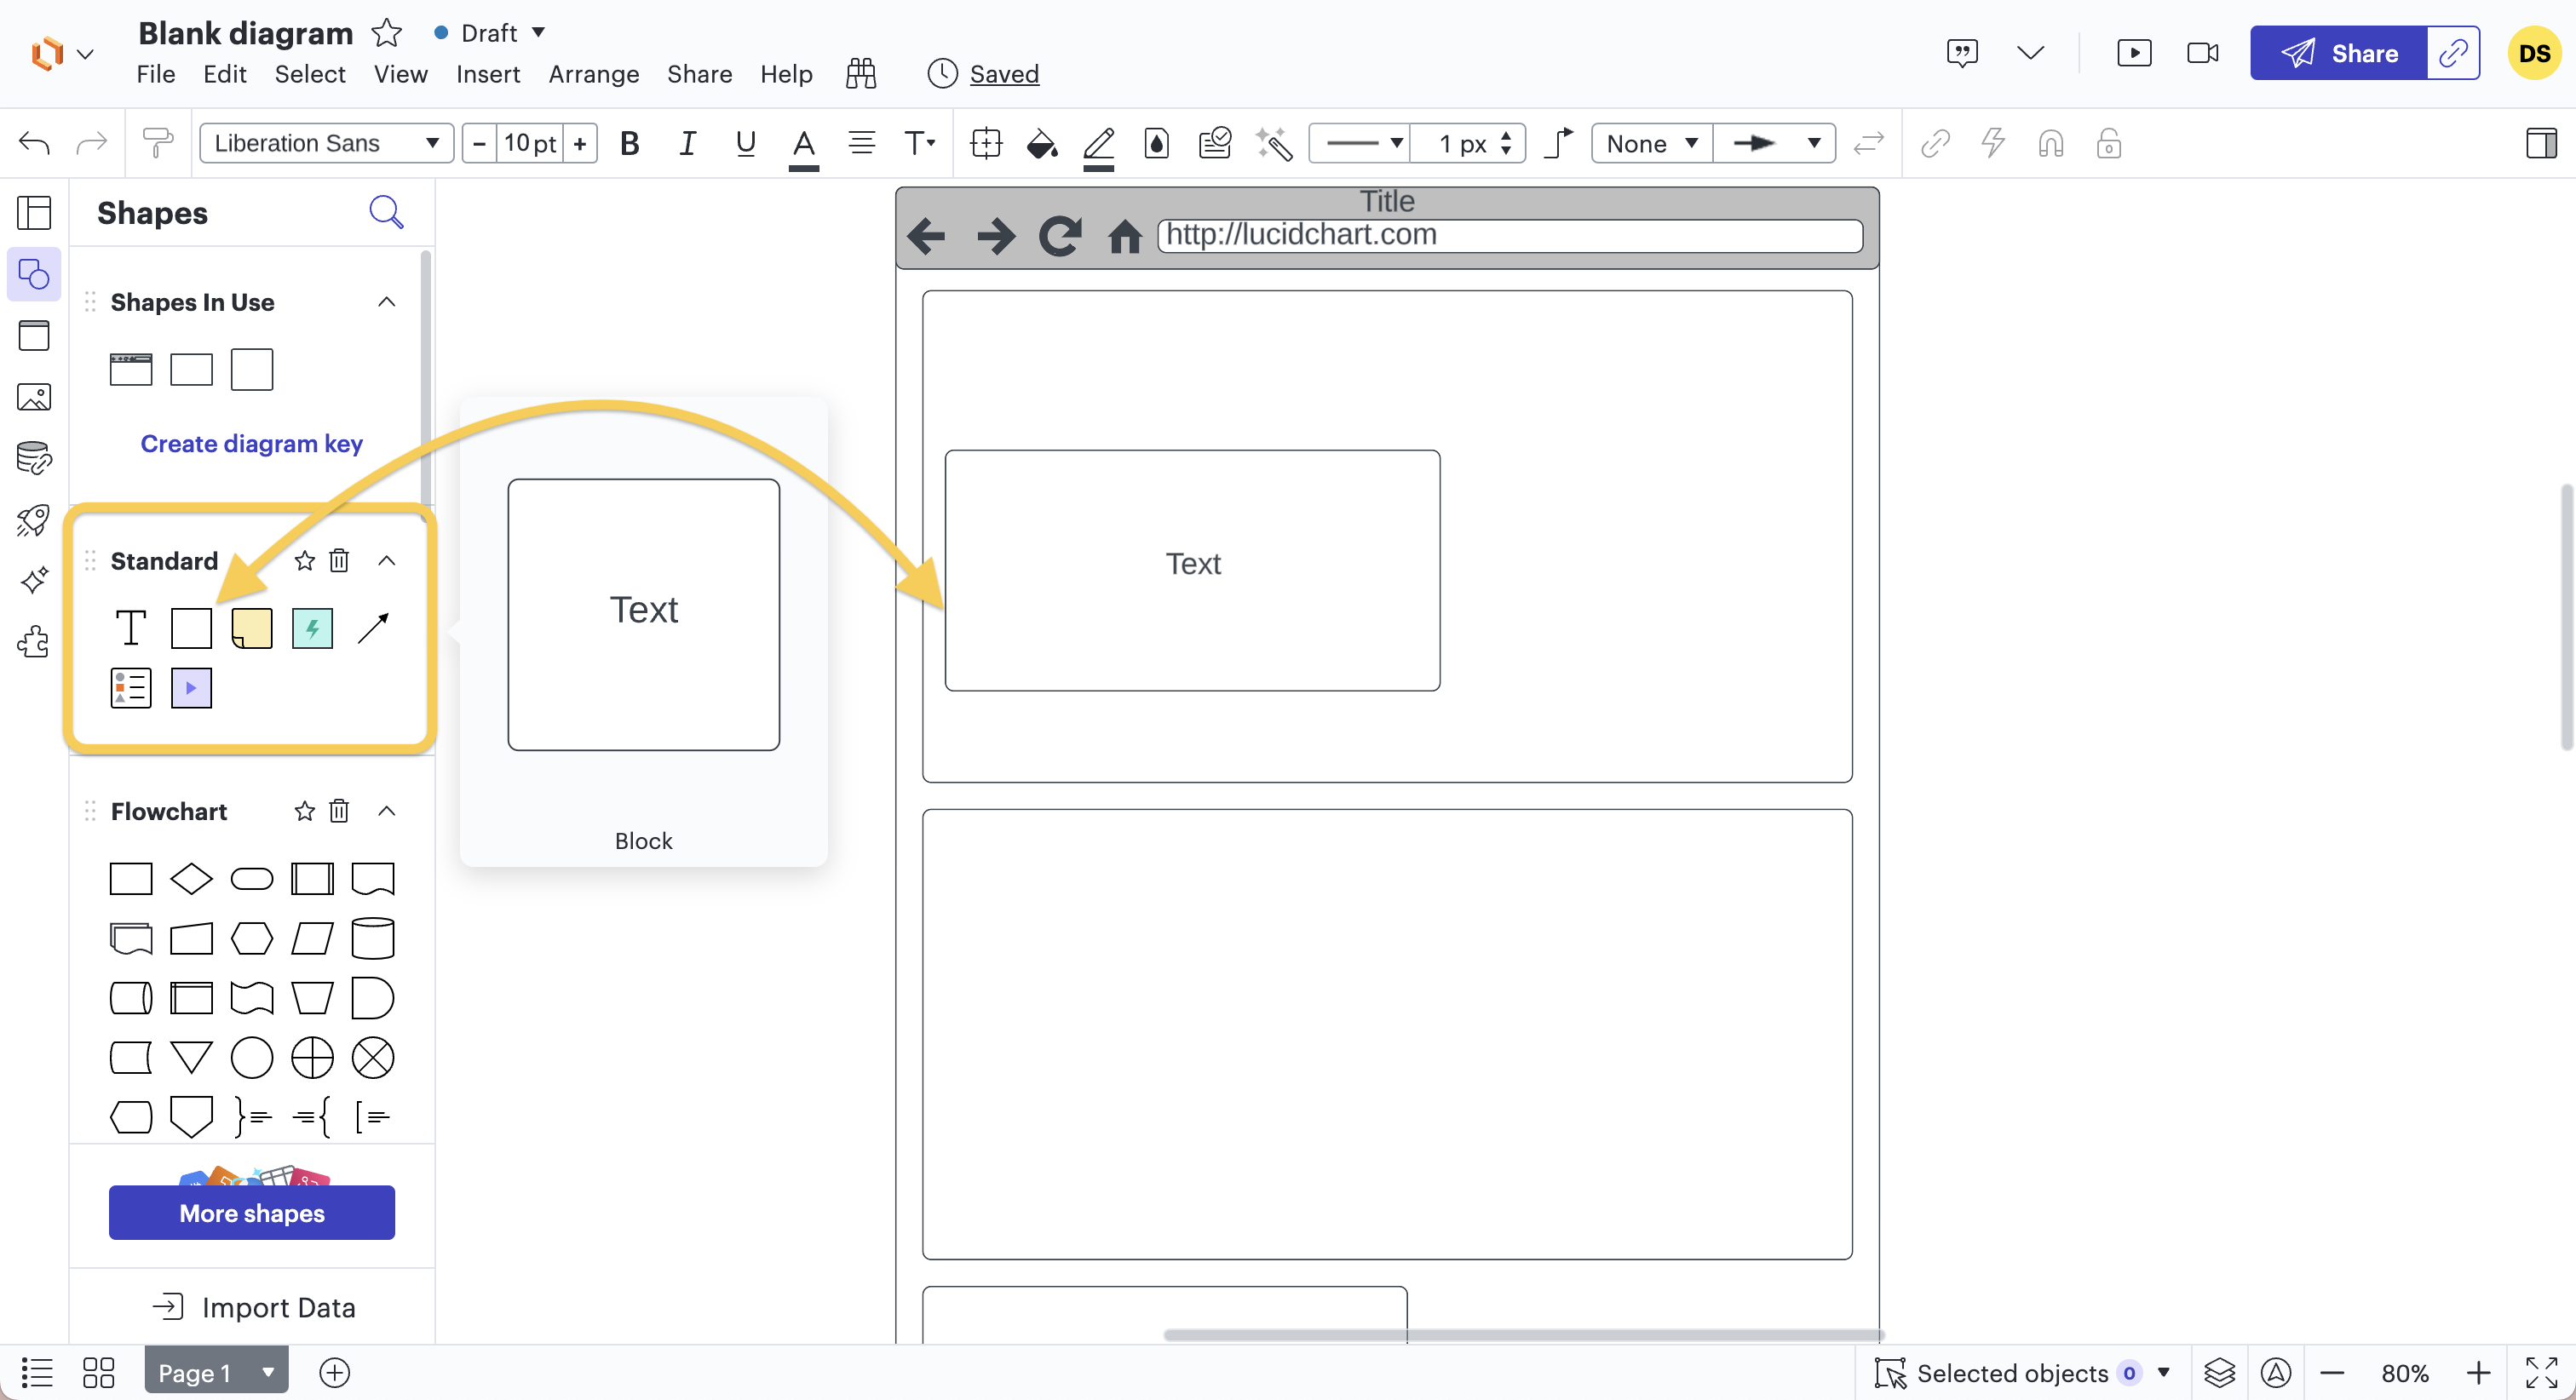
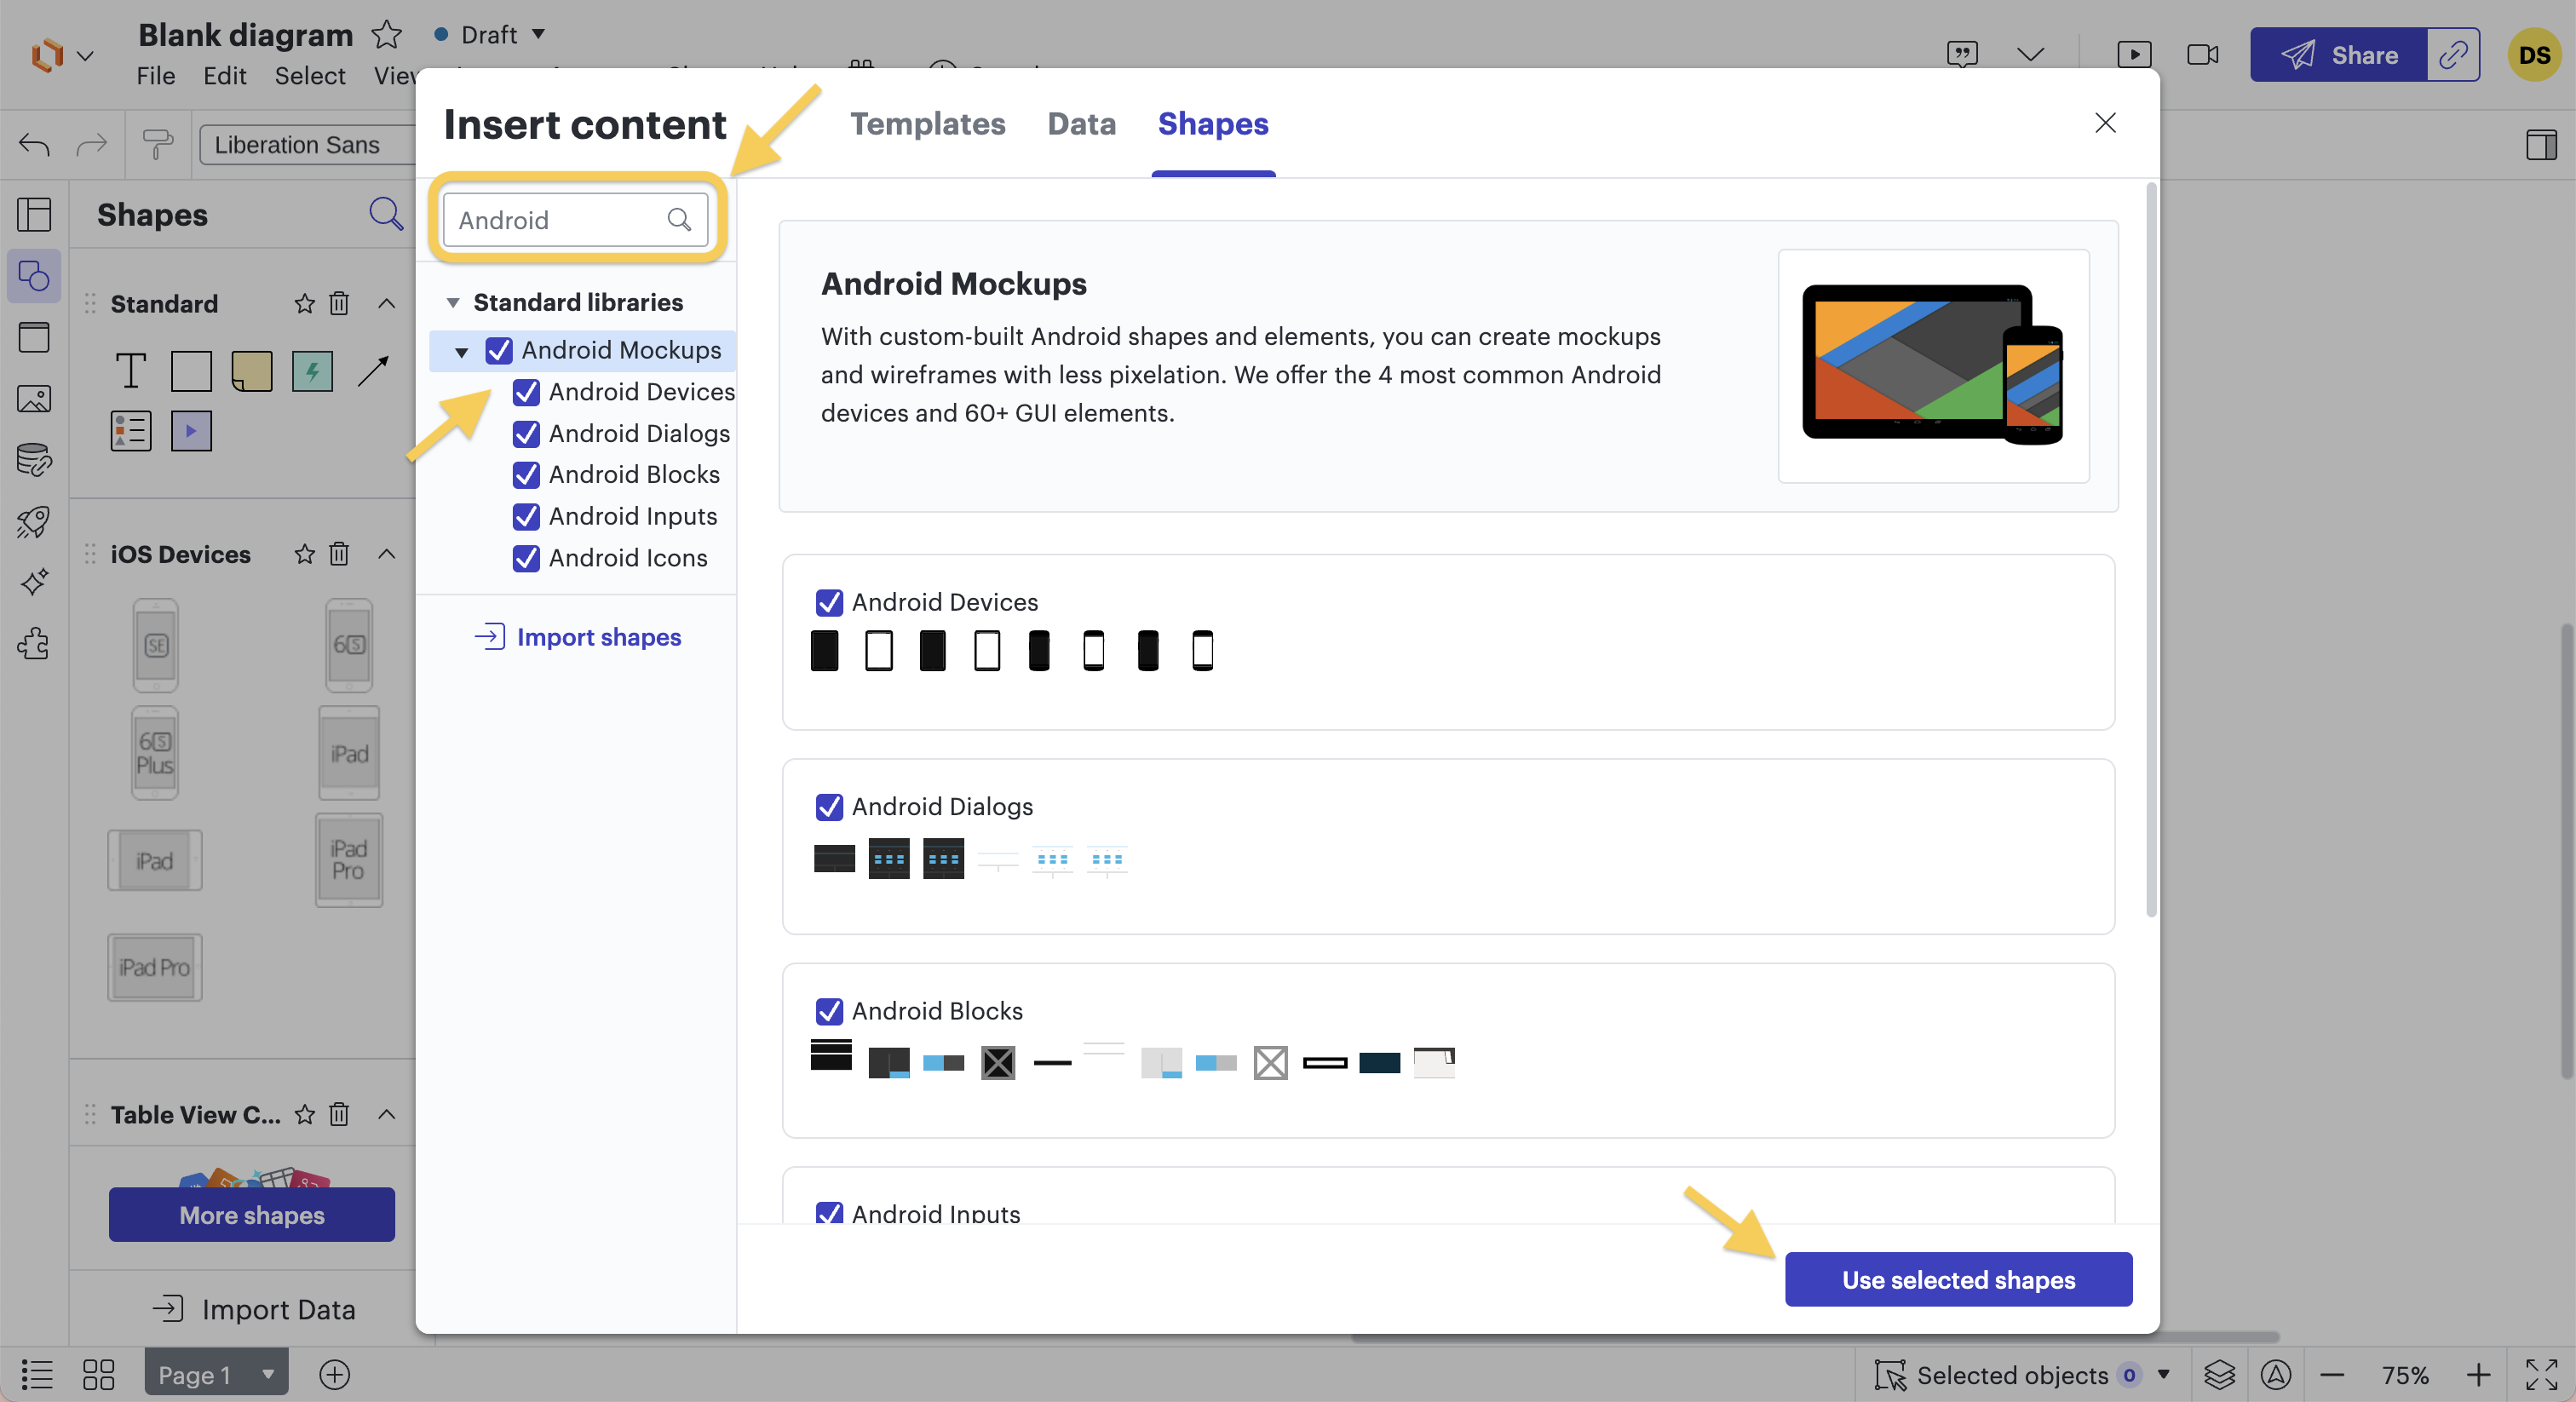
Step 2: Add the desired shapes
Once on our blank document, we already have access to certain standard shapes in the left bar, which we can use to build our wireframe. However, these shapes are limited and do not allow us to sketch a large number of elements on the blank page.
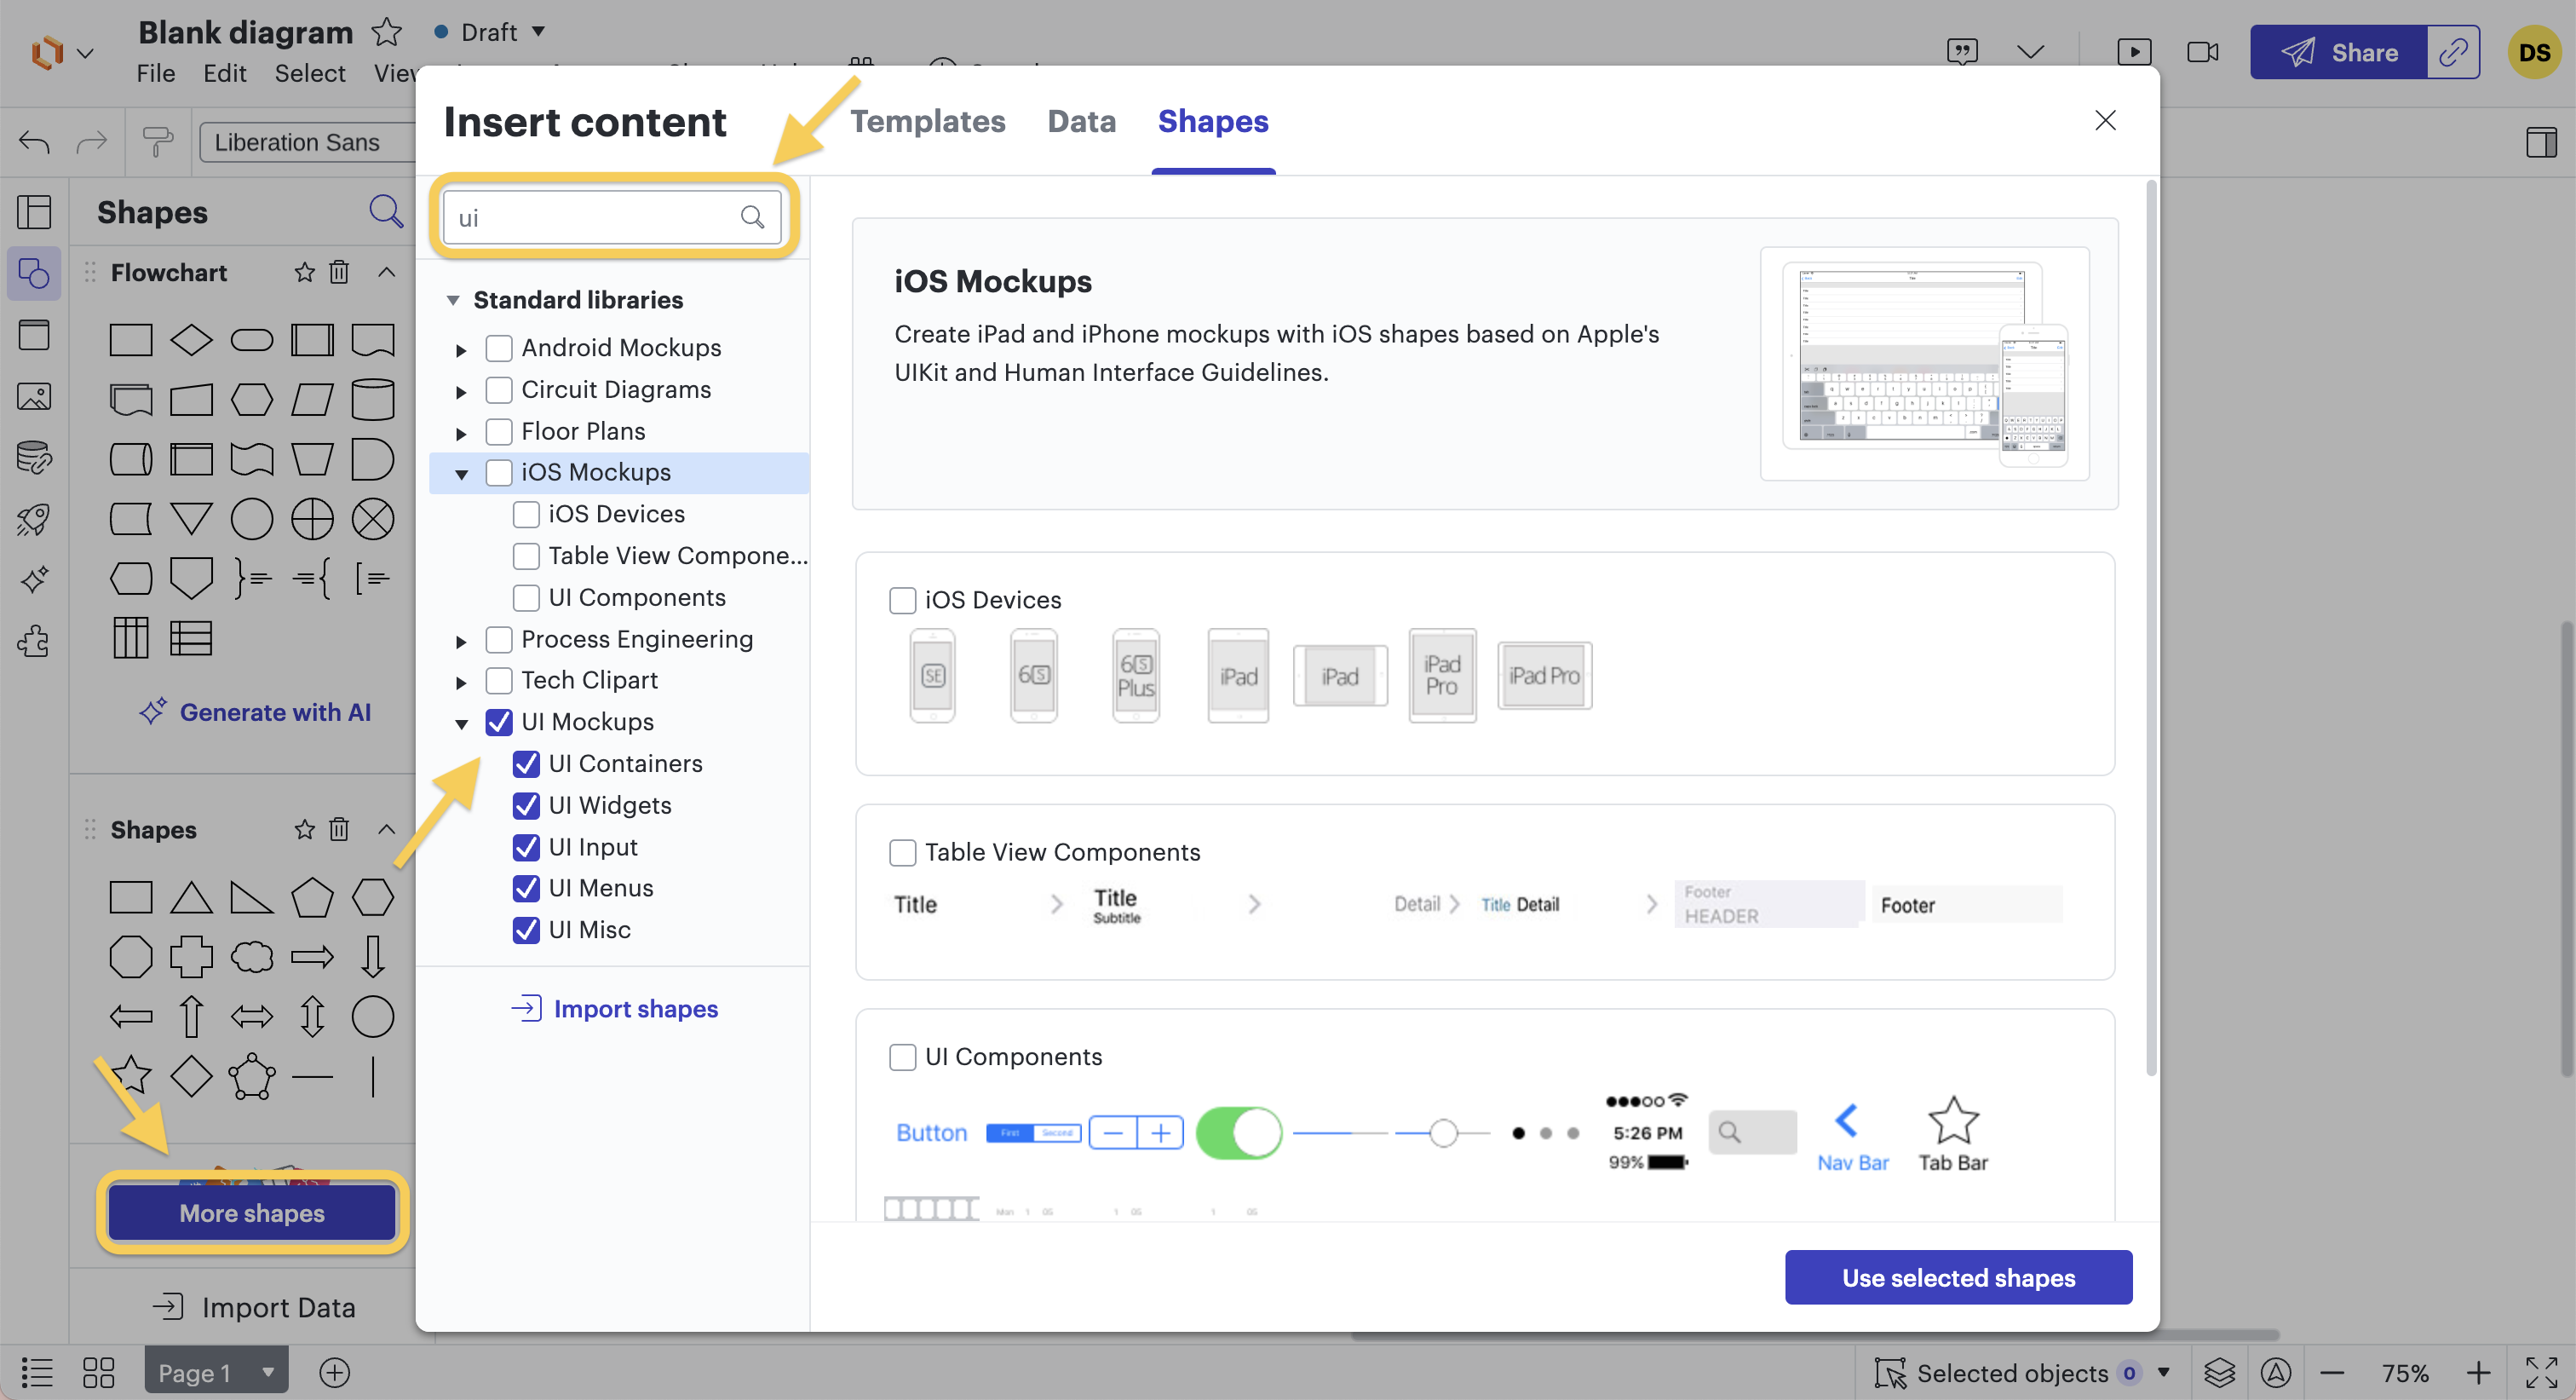
Therefore, we add one or more categories of shapes, which we find in the shapes library.
In the case of a website, the categories related to the UI (User Interface) are the most useful. So we search for these categories and even select the full UI model to get all the categories linked to the UI.
Step 3: Choosing and installing the UI container
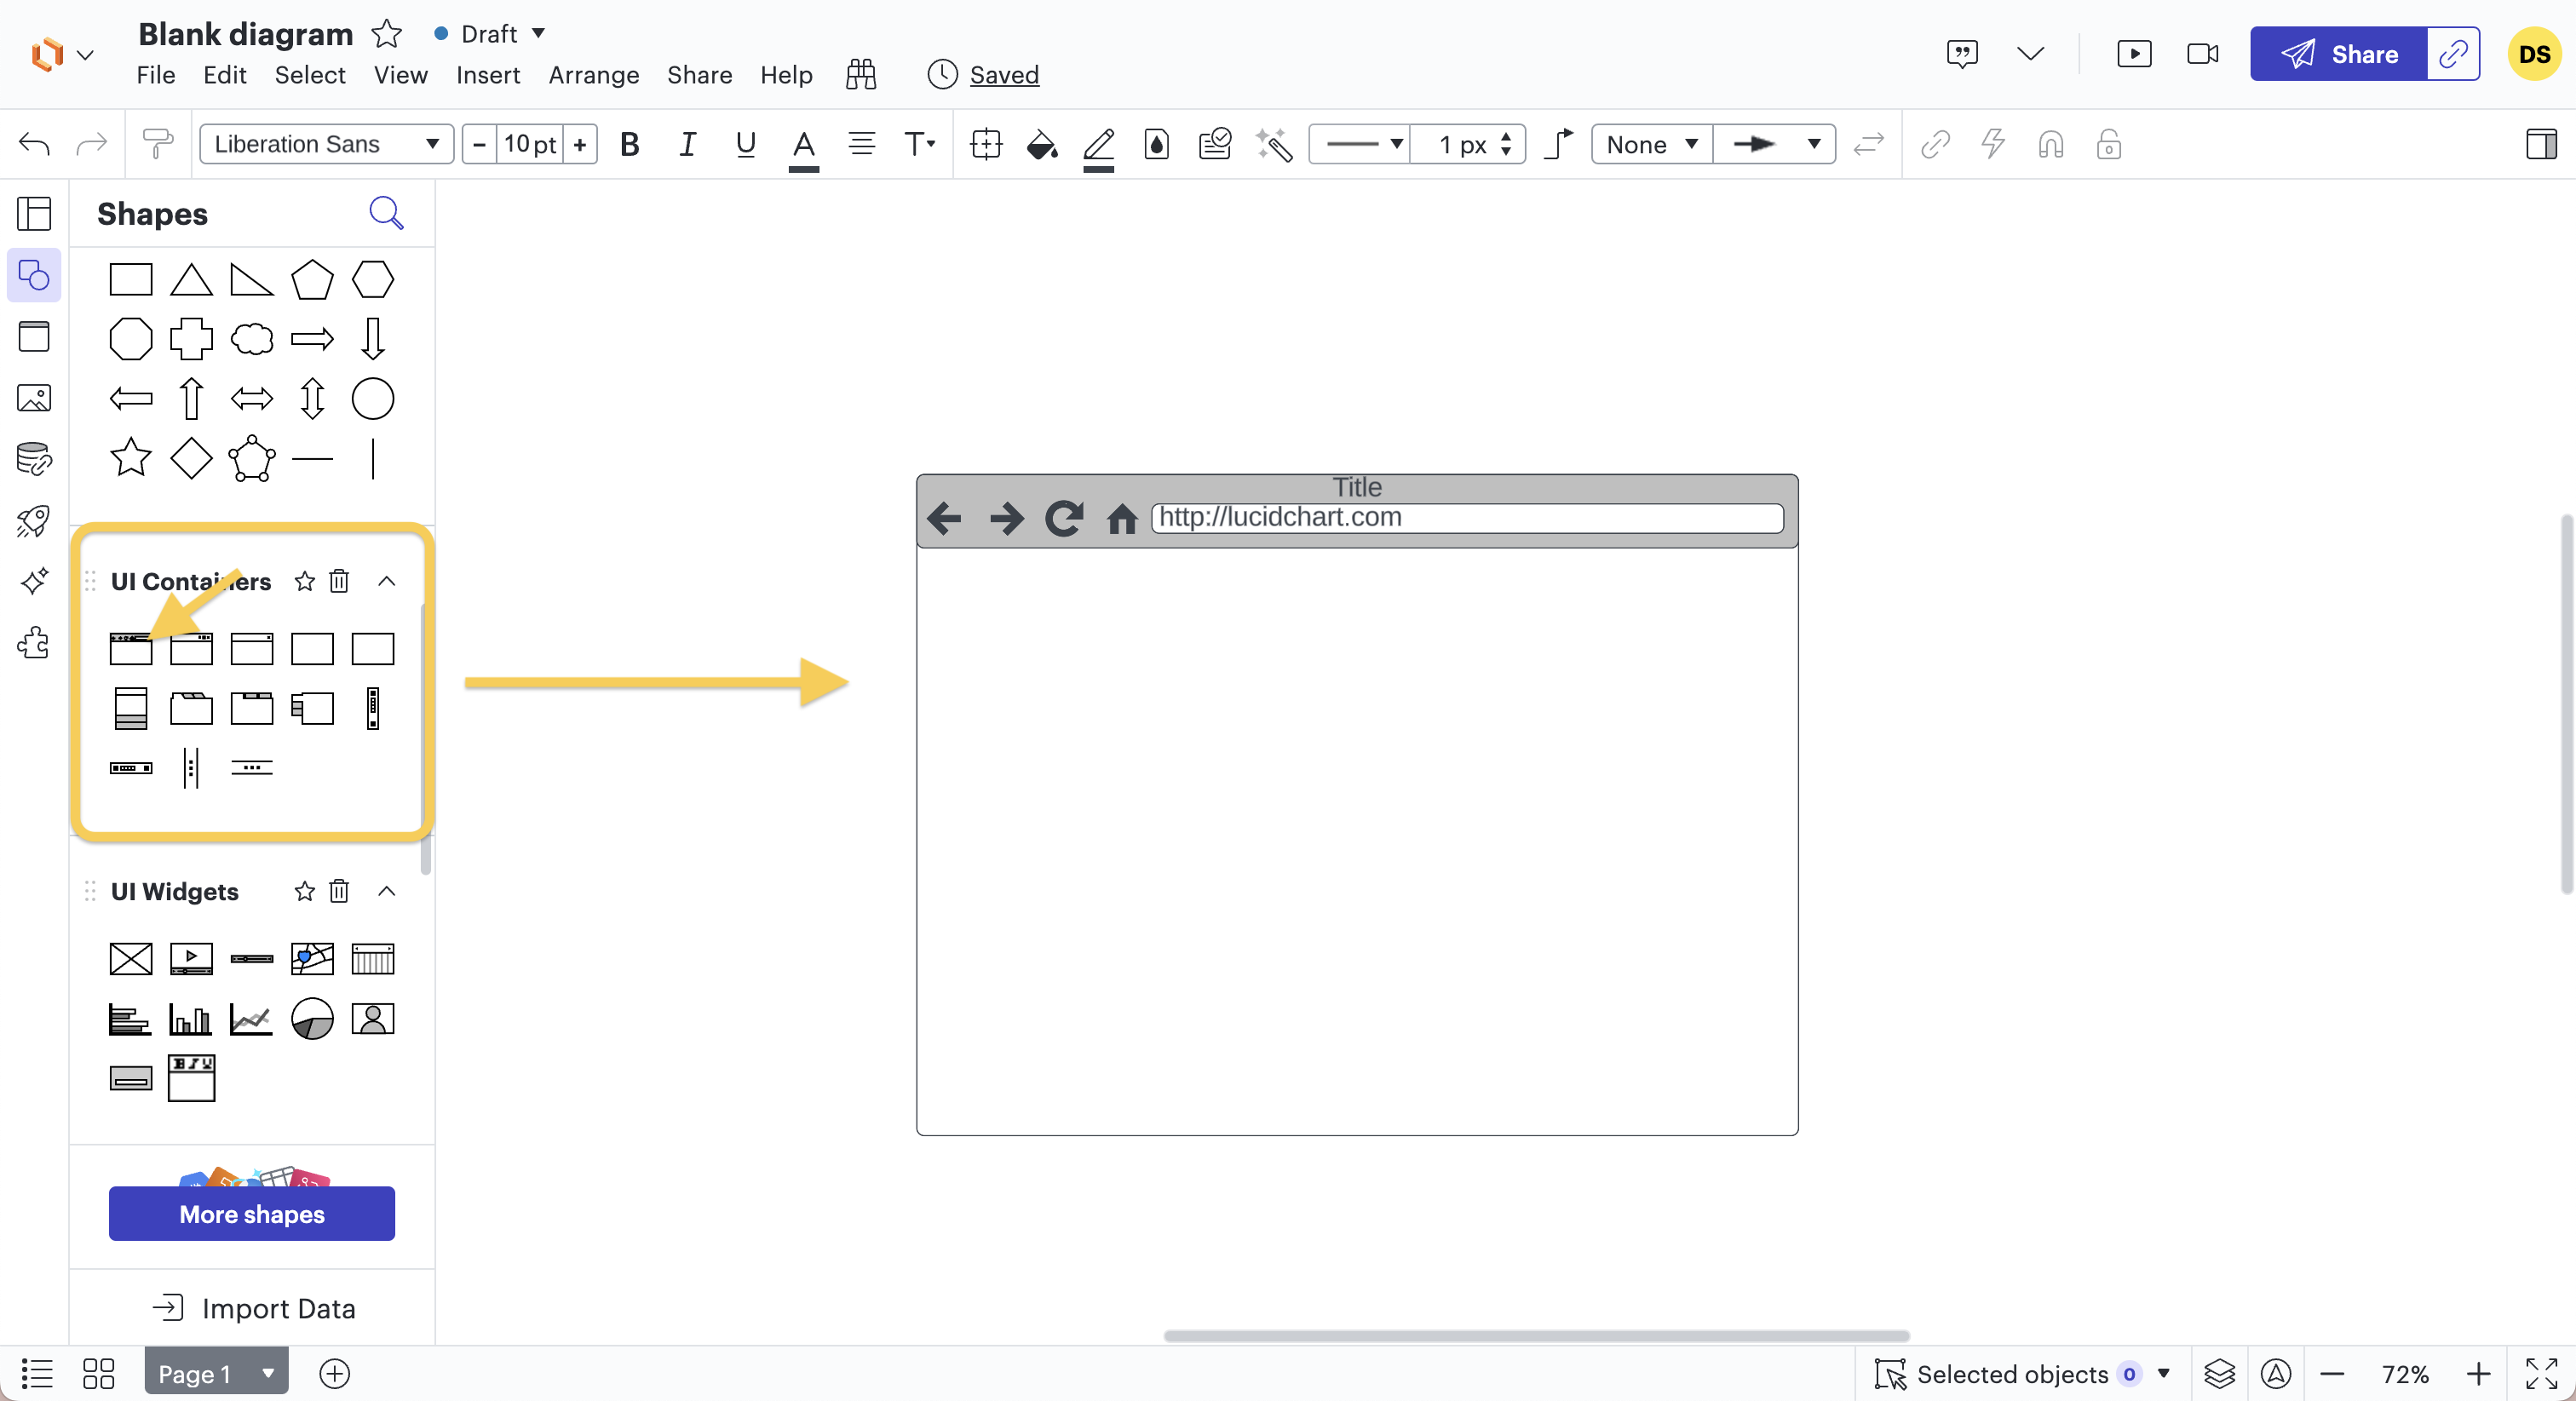
Next, we choose the frame for our wireframe by selecting the desired UI container from the list of shapes.
In our case, the wireframe represents a website, so we select the "navigation window".
Step 4: Adding zones and blocks
Once we have created the navigation window, it is time to fill it with the content and functionality shapes we want.
For this, we also use the shapes available on the left side of the page.
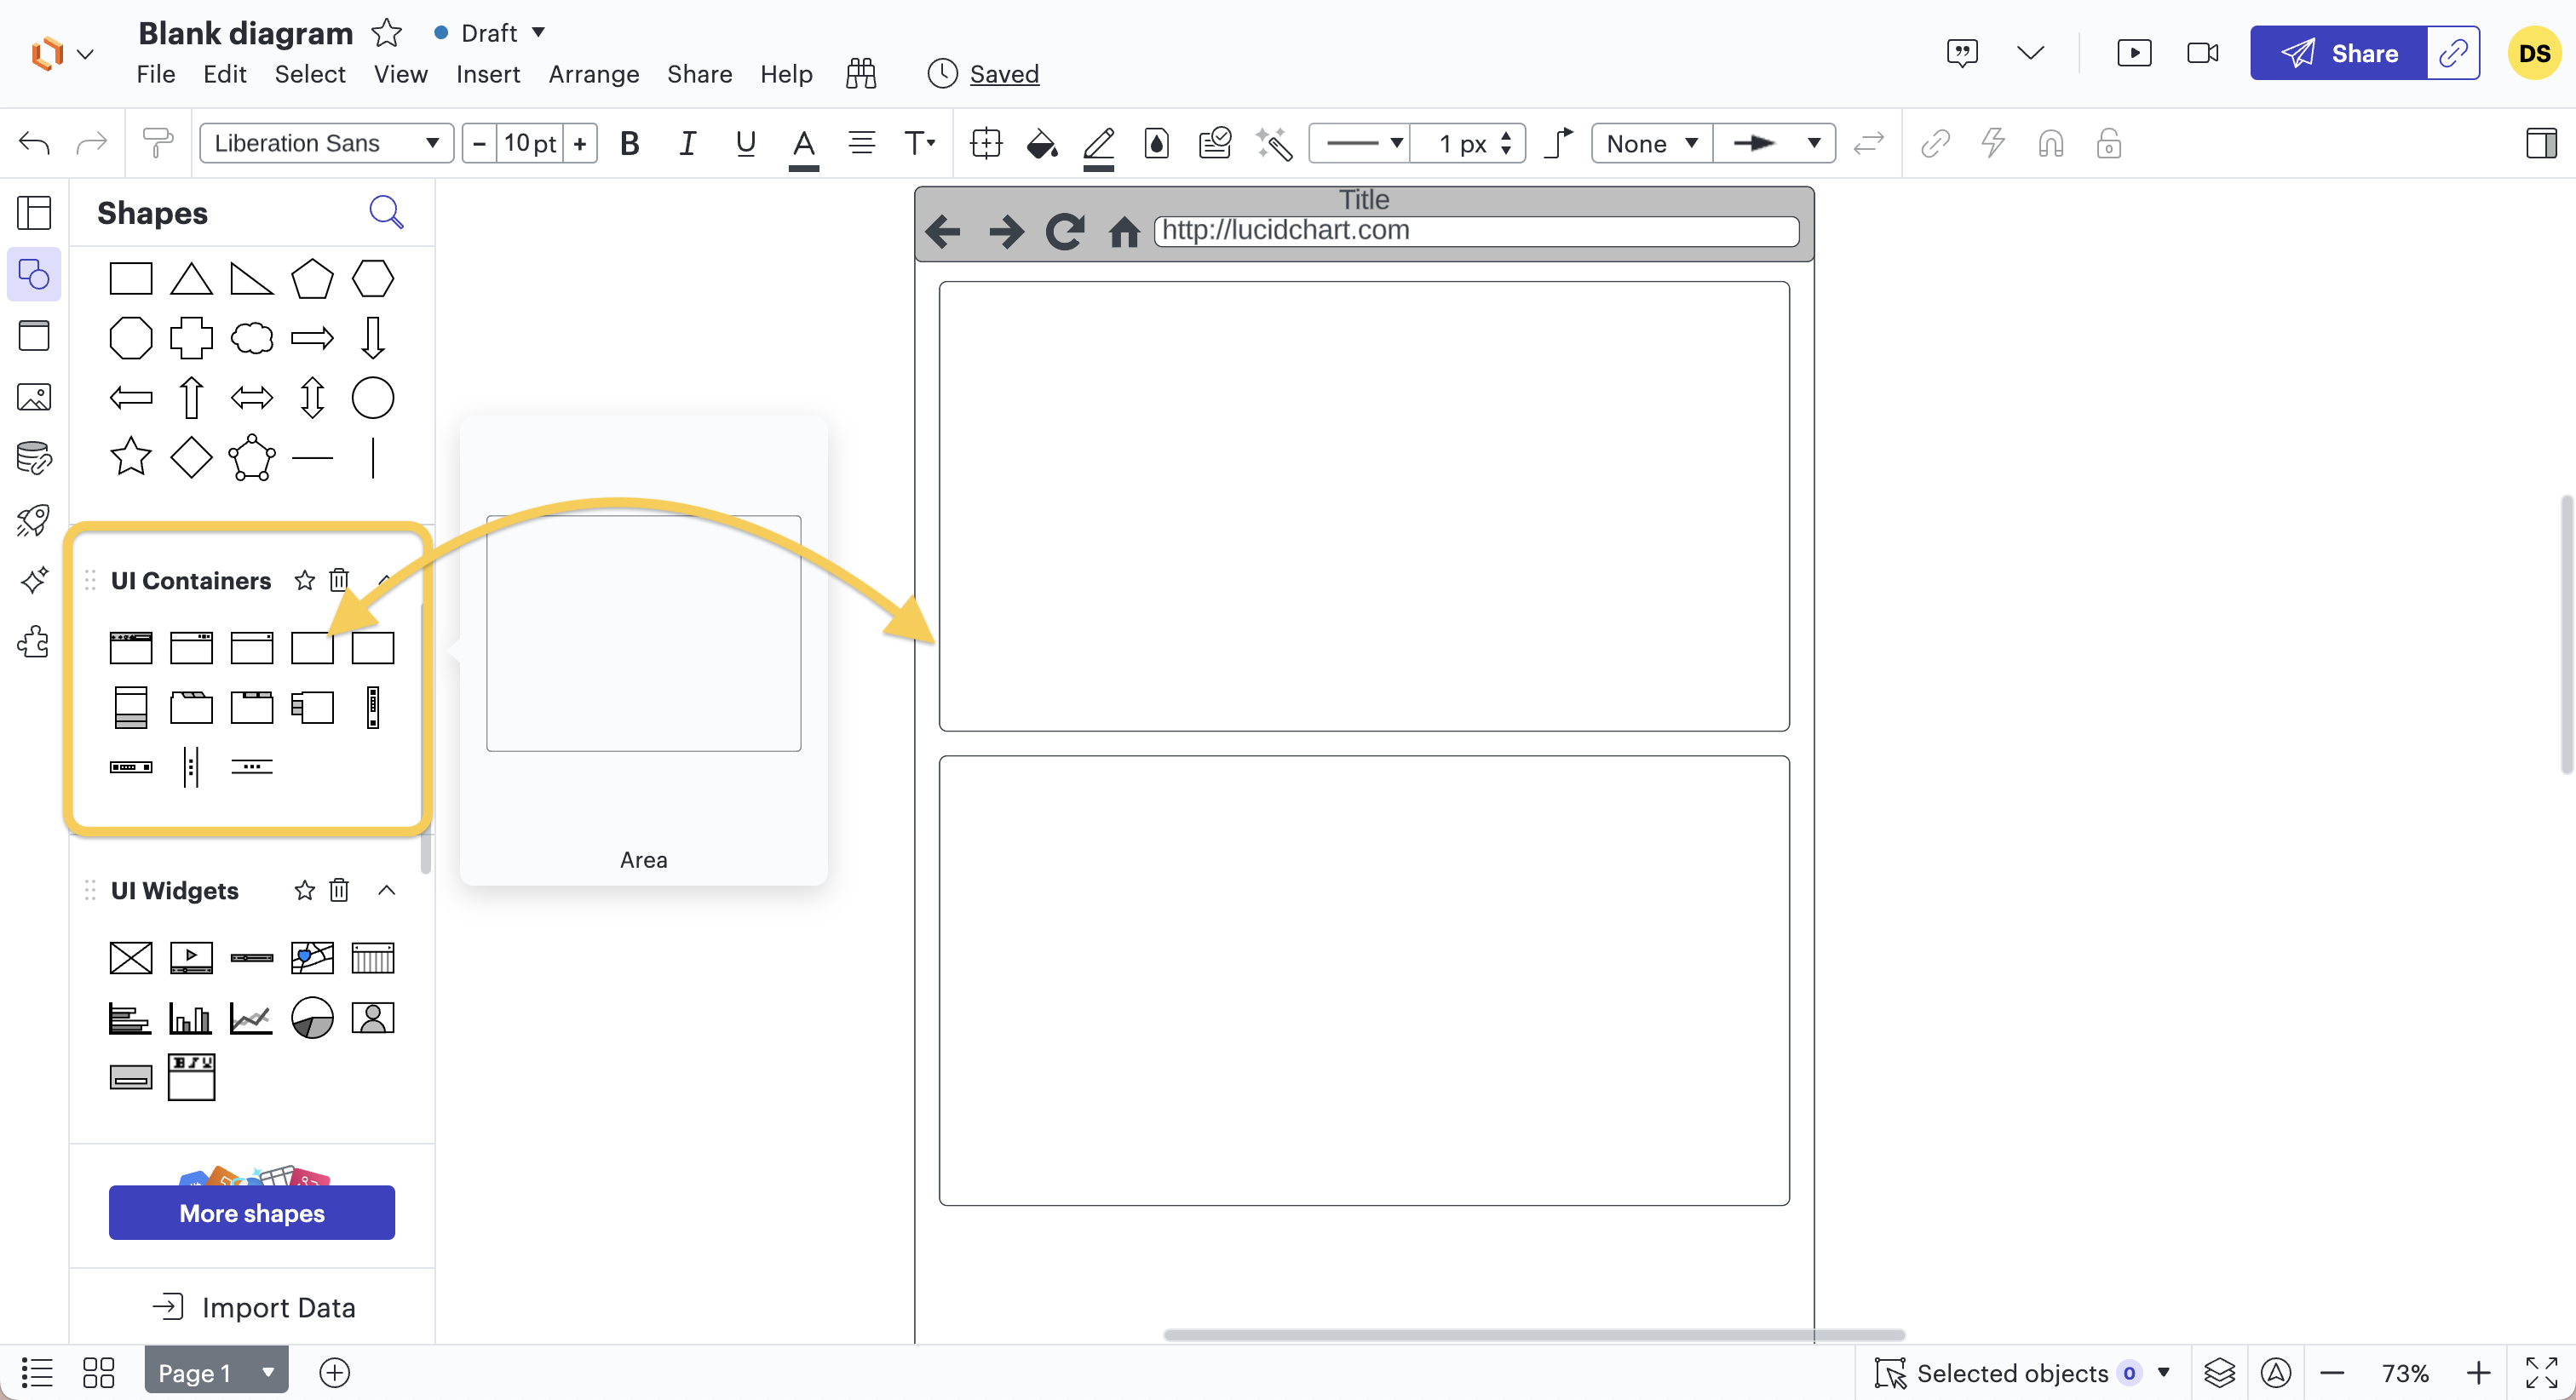
First, we define the page zones, if there are several, and the content blocks.
It is important to start with the zones and blocks before going into more detail, because they form the structure and foundation of our wireframe, a bit like a house where you lay the foundation first.
Step 5: Adding Images, Buttons, and Text
Now that we have defined our zones and blocks, we can add locations for images, photos, videos, text, buttons, charts, etc.
For this, we use all categories of UI shapes (UI widgets, UI input, UI menus, various UI), and we can, of course, add new categories of shapes if we don't find what we need.
There are also shape categories for IOS, Android, Google, ... which are worth adding for use on mobile or web, as some shapes in these categories are also available on IOS, Windows, or Android.

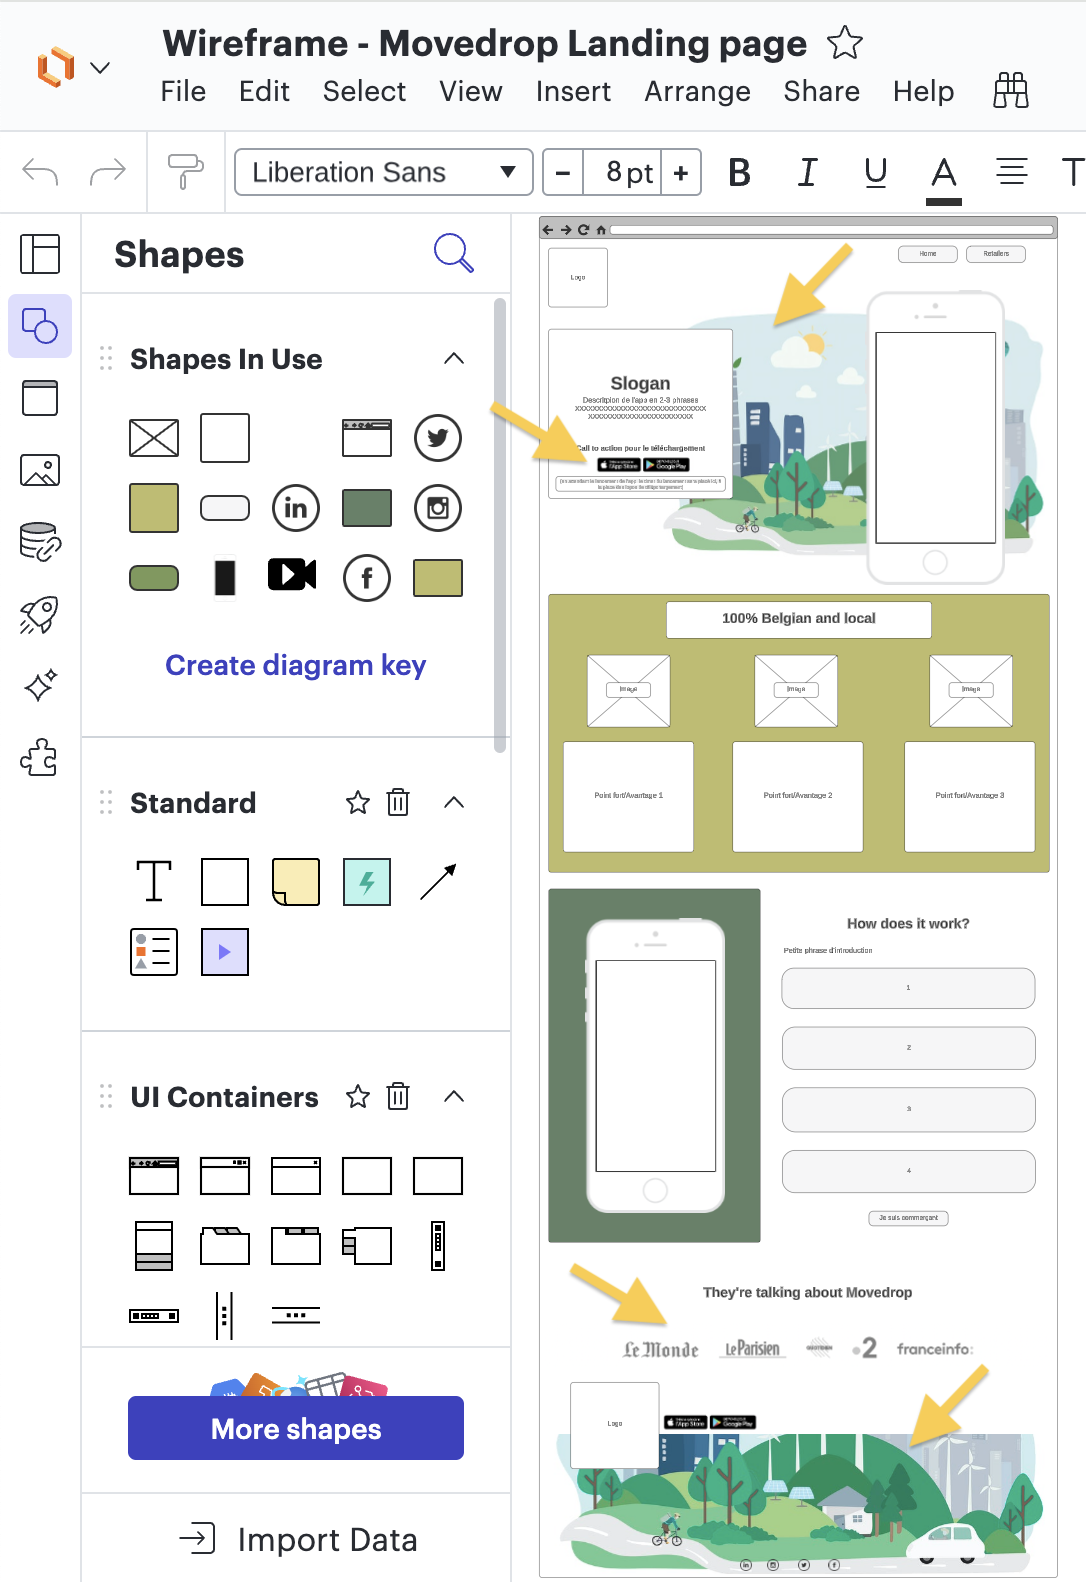
Step 6: Adding Illustrations - Optional
If we want to go further and make the wireframe a bit more realistic and less schematic, it's possible to add real images (logo, icon, etc.). However, adding real images should be limited so that our creation remains a wireframe and doesn't turn into a design.
It's important for the client to understand that it's indeed a schematic representation and that it can evolve. The same applies to the designer; it's crucial that they don't feel 'trapped' in the wireframe and can let their creativity be inspired by it rather than strictly adhering to it.
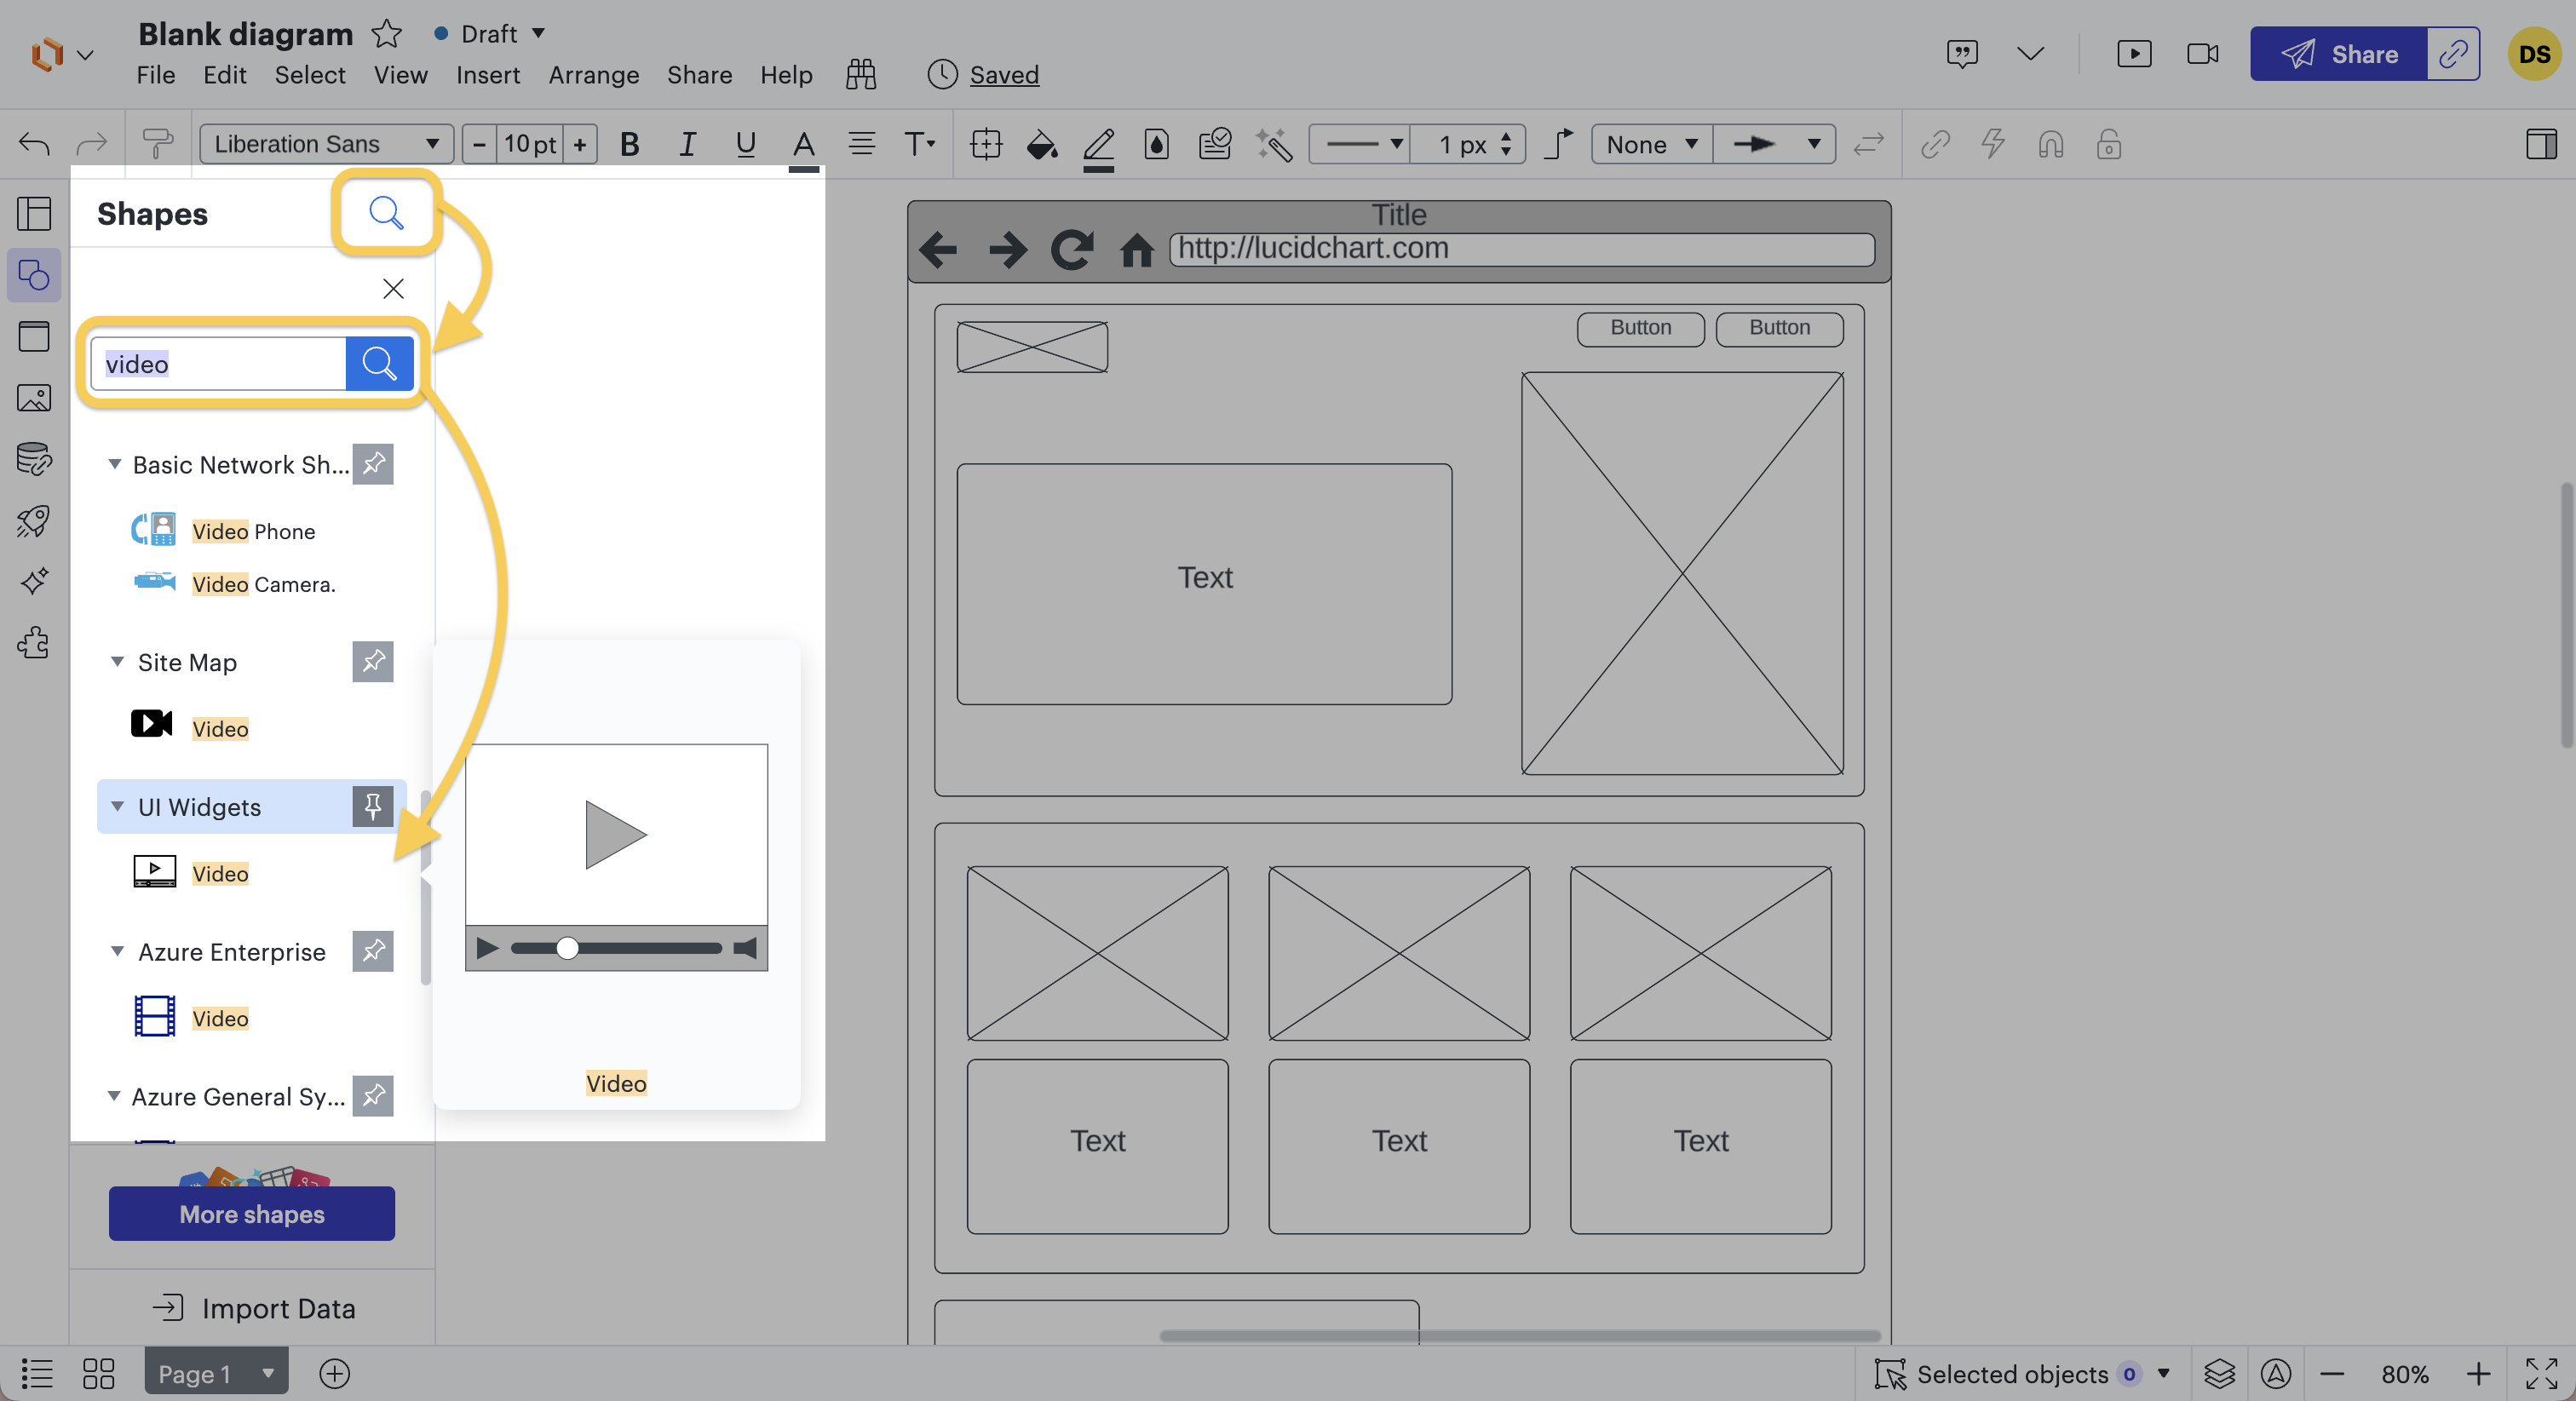
It's also possible to search for shapes or graphic elements using the magnifying glass.
In the case of Movedrop, an image was added to the top and bottom of the wireframe to give an idea of the website's atmosphere. Logos of media and buttons for downloading Apple and Google were also added to clarify their functionality.
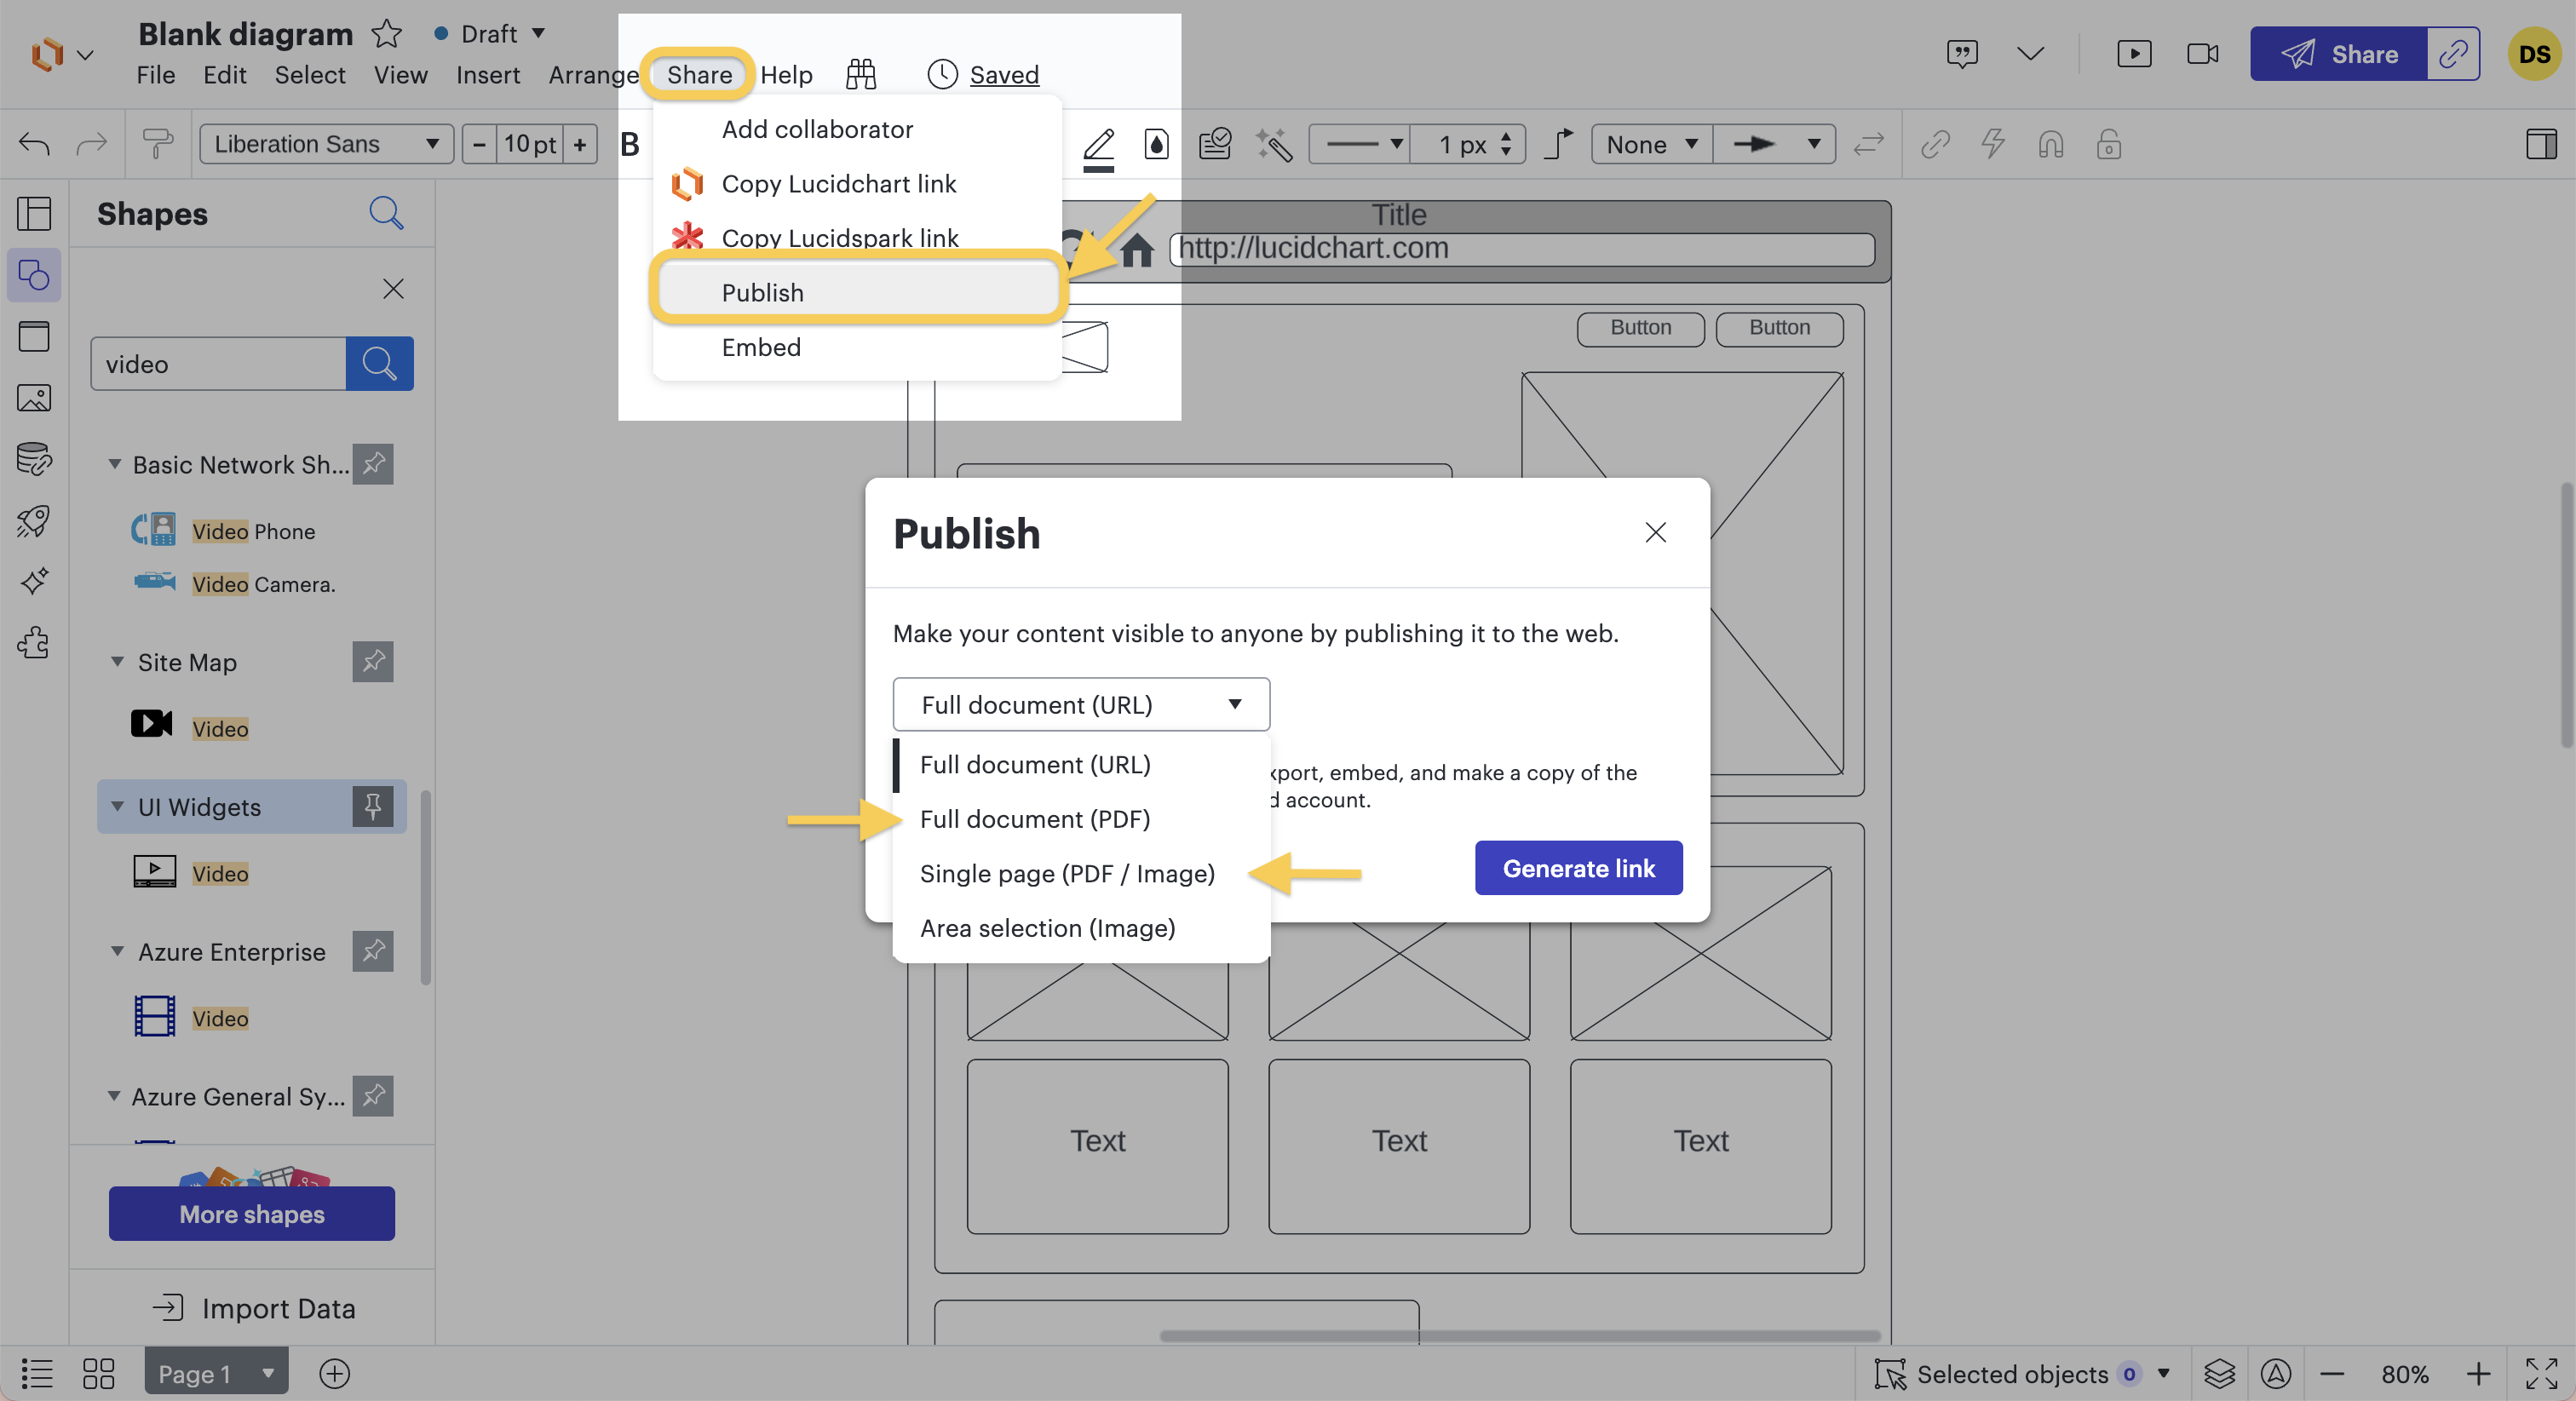
Step 7: Saving and Using the Wireframe
After the wireframe is ready, we can save and export it to present it to the client and then hand it over to the designer.
When we place the wireframe and the final design side by side, we can see that the designer did indeed draw inspiration from the wireframe for the construction of the website. This technique allows the designer to receive the general information needed for designing the layout (laying the foundations), while also providing the flexibility to express creativity and deviate from the wireframe's constraints.
#6.
How do you create wireframes for a mobile application?
For the construction of the wireframes of a mobile application, we still use the Movedrop project, but this time for the app:
For this project, we will once again create wireframes for the various pages of the mobile application. These will help the client visualize how the app will look and what information they need to provide us (text, images). Similar to the wireframes for the website, they will then enable the designer to get an idea of the desired appearance and the content to be included in the design.
Step 1: Creating a new project on Lucidchart
Just like for the website, after logging into our account, we create a new document. This document will be named "Movedrop - Mobile App" this time. For creating this new wireframe, we select a blank Lucidchart document.
 Step 2: Add the Desired Shapes
Once on our blank document, we already have access to some standard shapes in the left sidebar to start building our wireframe. However, these shapes are limited and don't allow us to sketch a large number of elements on the blank page.
Therefore, we add one or more categories of shapes to the shape library.
The categories most useful for us in the case of a mobile application are those associated with UI, IOS, and Android. We search for these categories and even select complete mock-ups to obtain all the categories linked to UI, IOS, and Android.
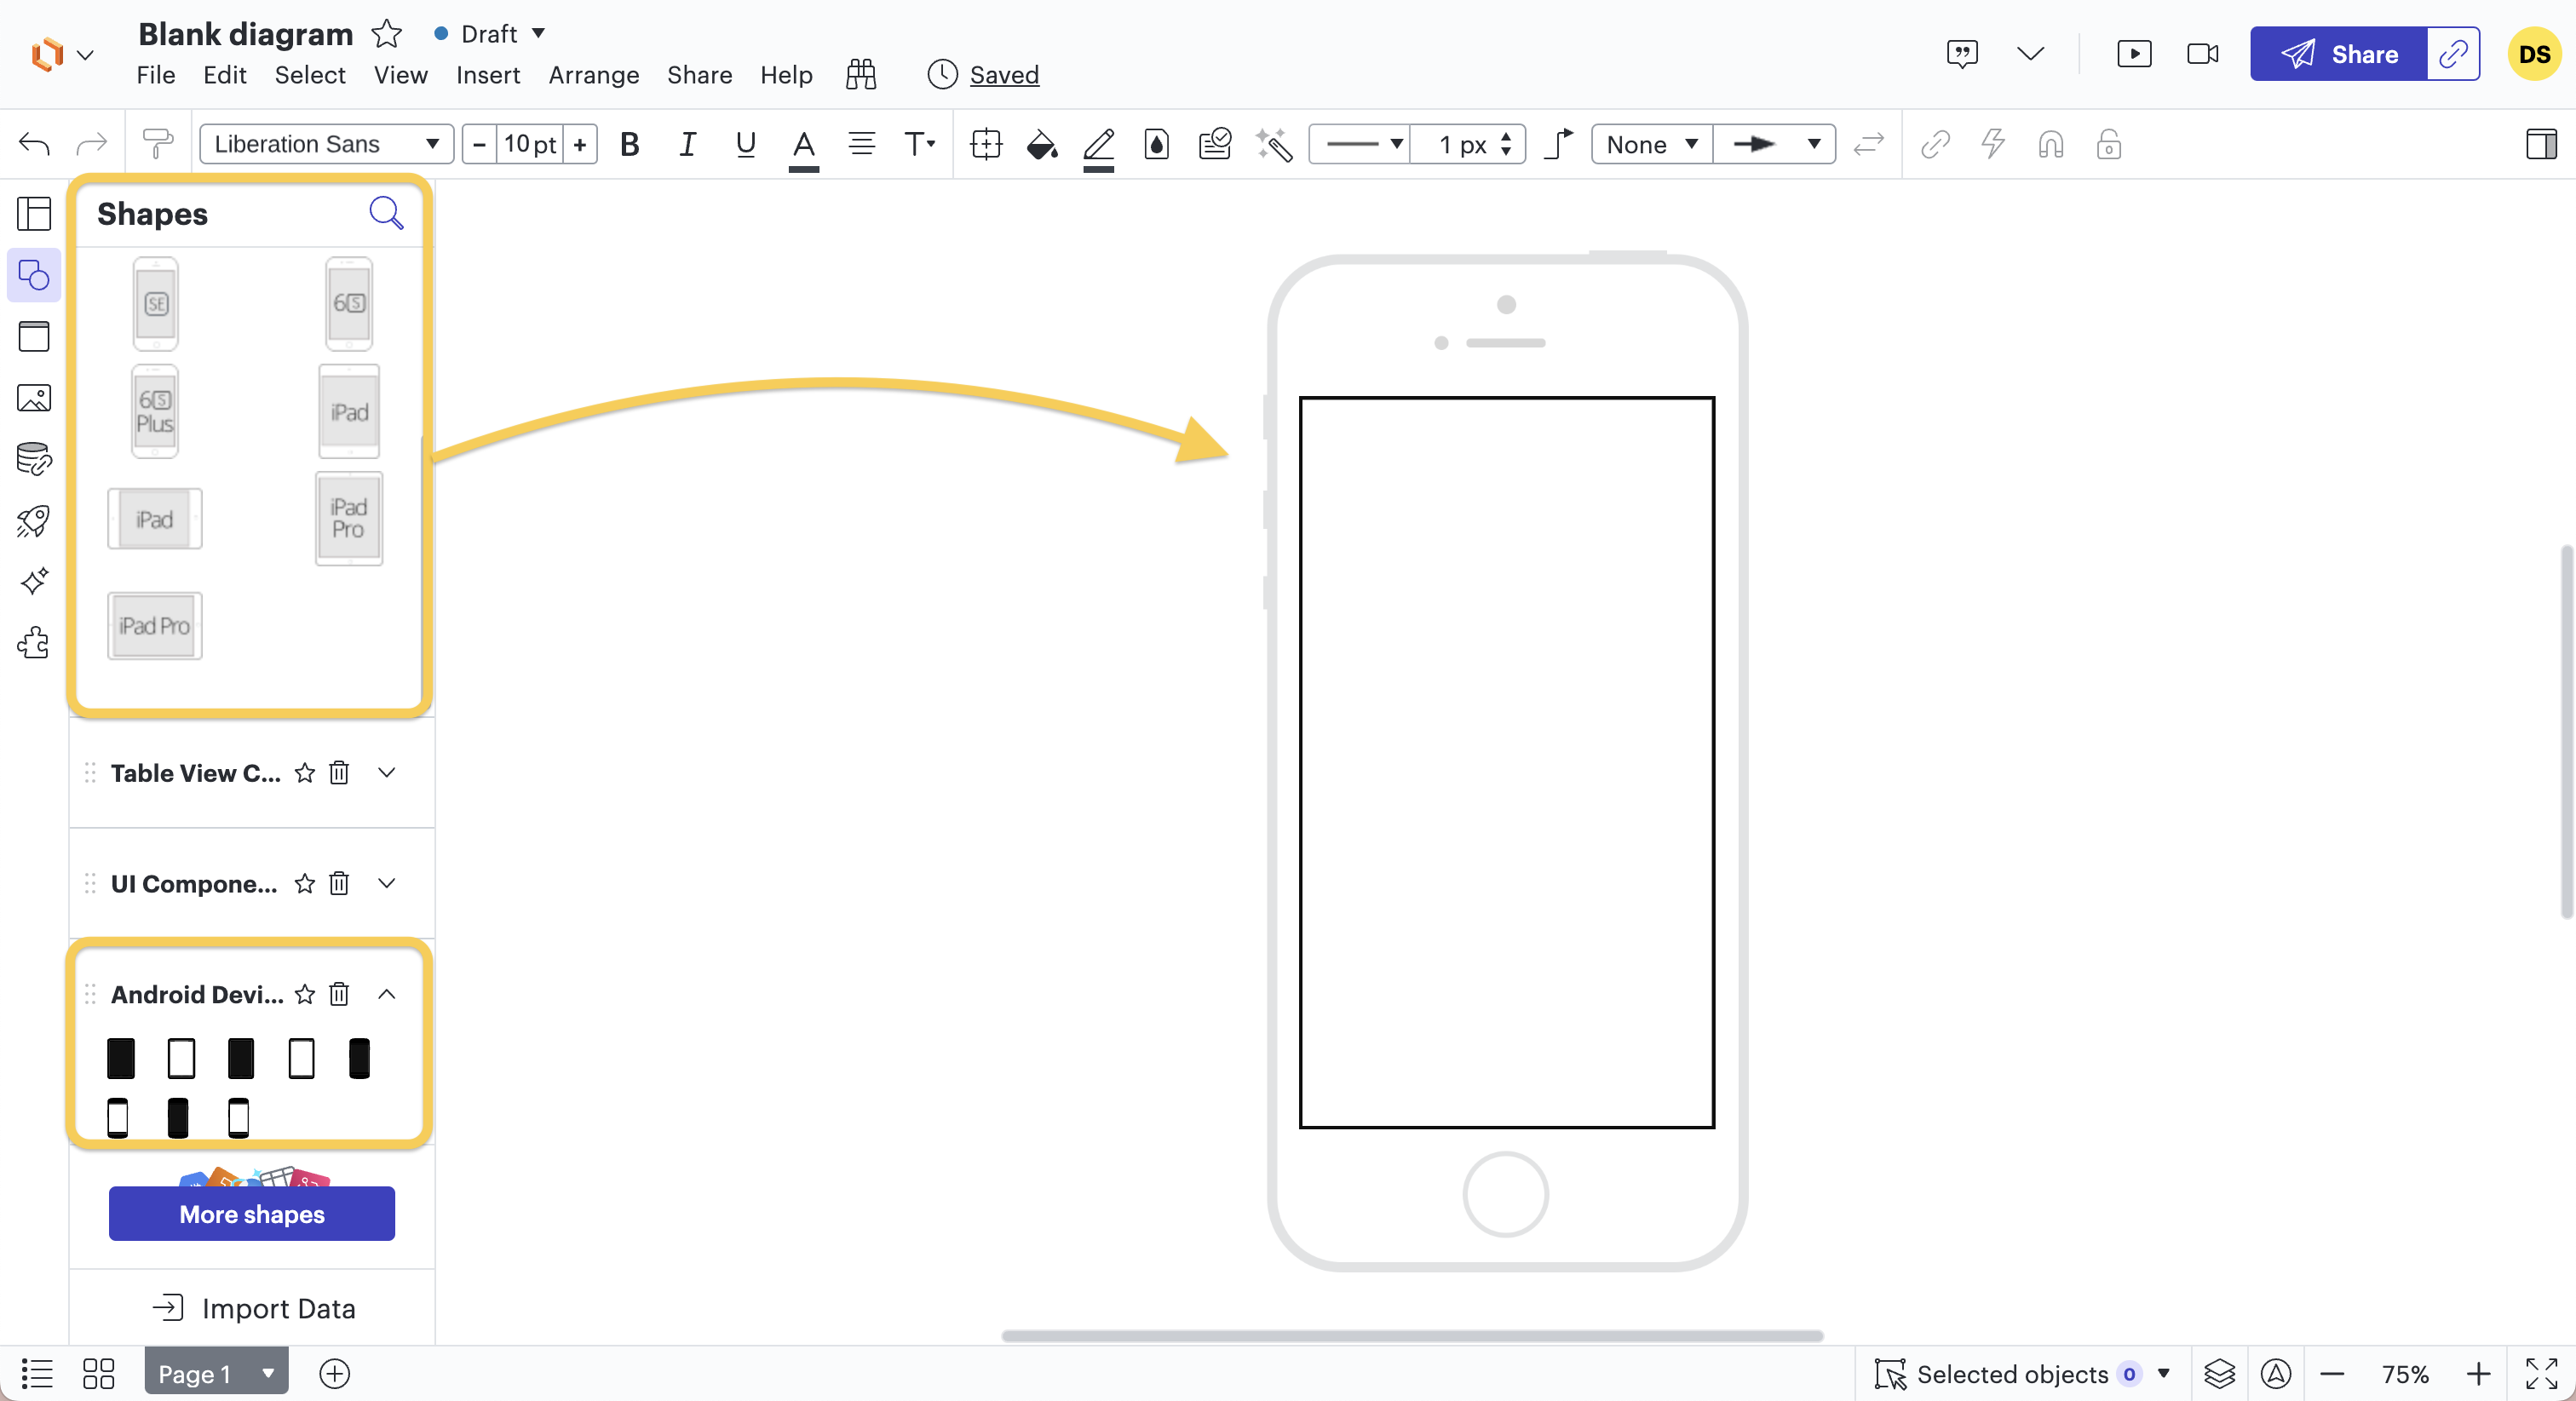
 Step 3: Choose and Install the UI Container
Next, we choose the frame for our wireframe by selecting the desired UI container from the list of shapes.
In our case, representing a smartphone, we select the "iPhone 6S" (other smartphone models are also suitable).
 Step 4: Add Images, Buttons, and Text
Once we have created the wireframe, it's time to fill it with the desired content and functionalities.
To do this, we also use the shapes available to us on the left side of the page.
Unlike wireframes for a website, we don't necessarily use content zones or blocks. The mobile screen is much smaller than that of a computer, so it's crucial to get straight to the point and simplify the screen and the information on it.
Sometimes, it's even better to add screens to lighten them (for registration, for example, we can create a 1st screen with personal information, a 2nd with registration proposals, and a 3rd with registration validation. The coding is smoother, less crowded, and the user gets a better experience).
Moreover, the use of a mobile application is different from using a website. It is more frequent, so the customer experience needs to be optimized. The interface should be more user-friendly and straightforward (one screen = one type of information).
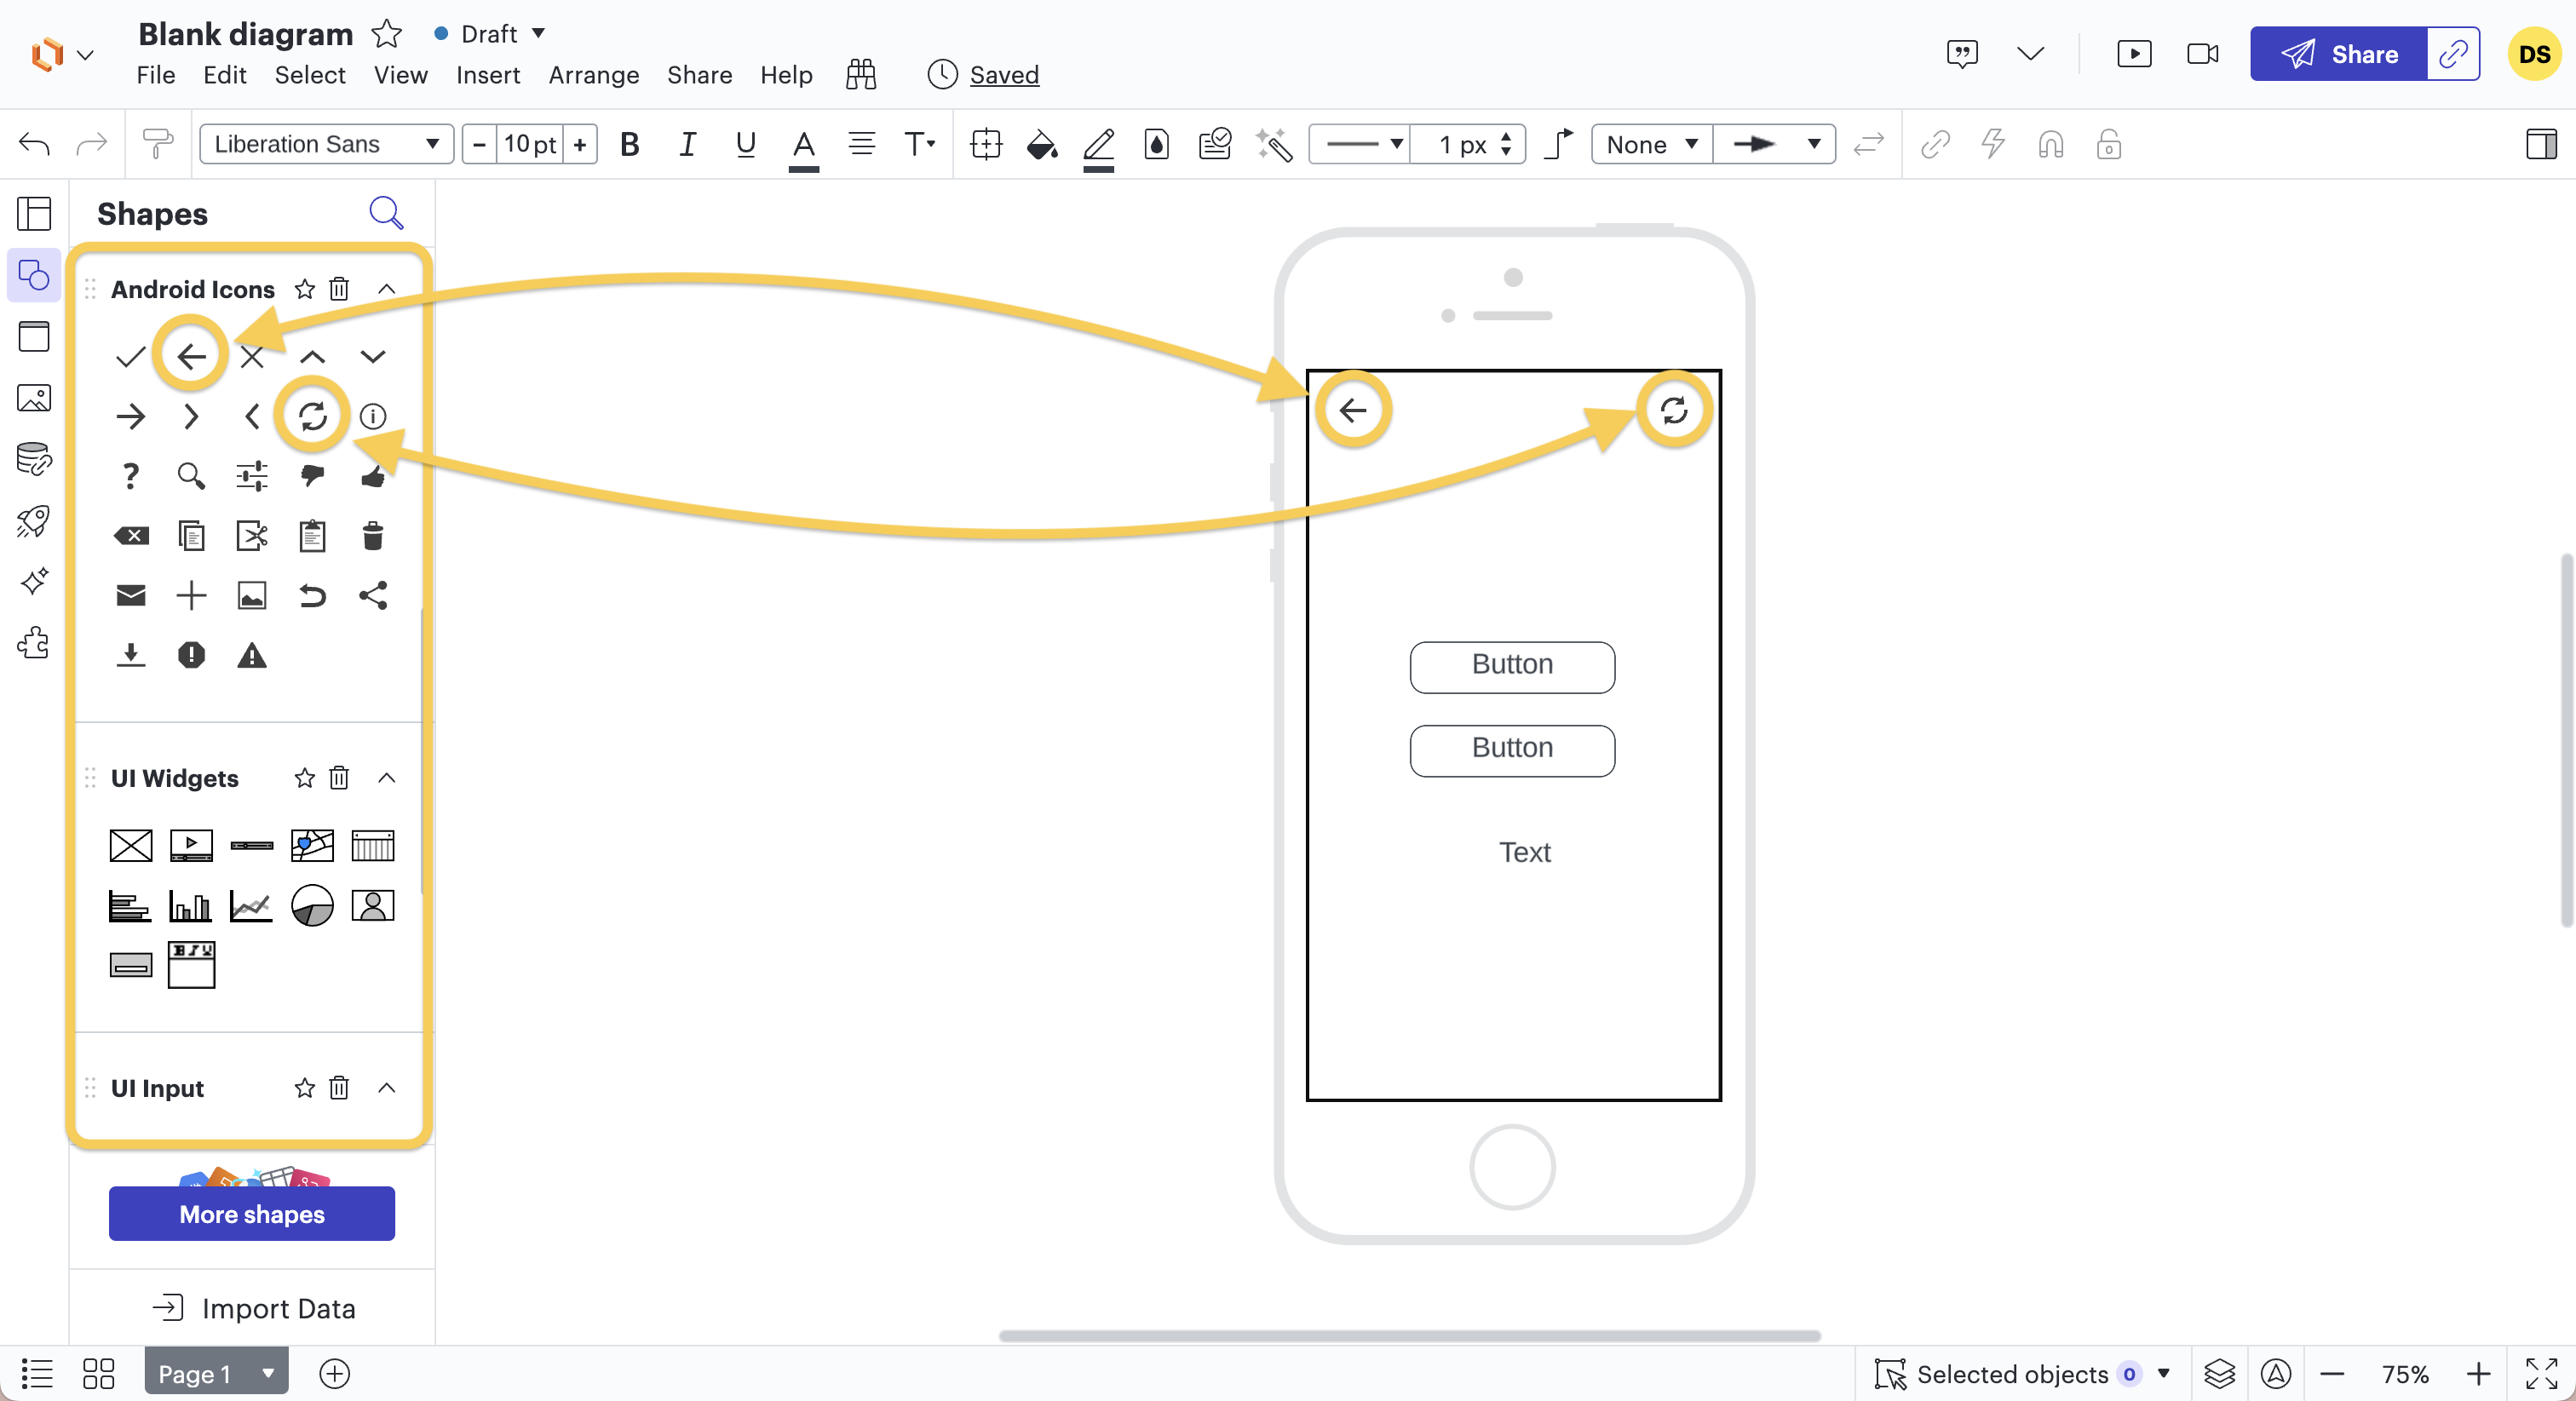
Therefore, we can directly add locations for images, photos, videos, text, buttons, charts, etc.
For this, we use all the shape categories of UI, IOS, and Android (Widgets, Input, Menus, Components, Icons, Miscellaneous), and, of course, we can add new shape categories if we don't find what we need.
Step 5: Addition of Illustrations - Optional
If we want to go further and make the wireframe a bit more realistic and less schematic, it is possible to also add real images (logo, icon, etc.). However, adding real images should be limited so that our creation remains a wireframe and does not turn into a design.
It is important that the client understands that this is indeed a schematic representation and can evolve. The same goes for the designer; it is essential that they do not feel "confined" by the wireframe and can let their creativity be inspired by it without being bound by strict rules.
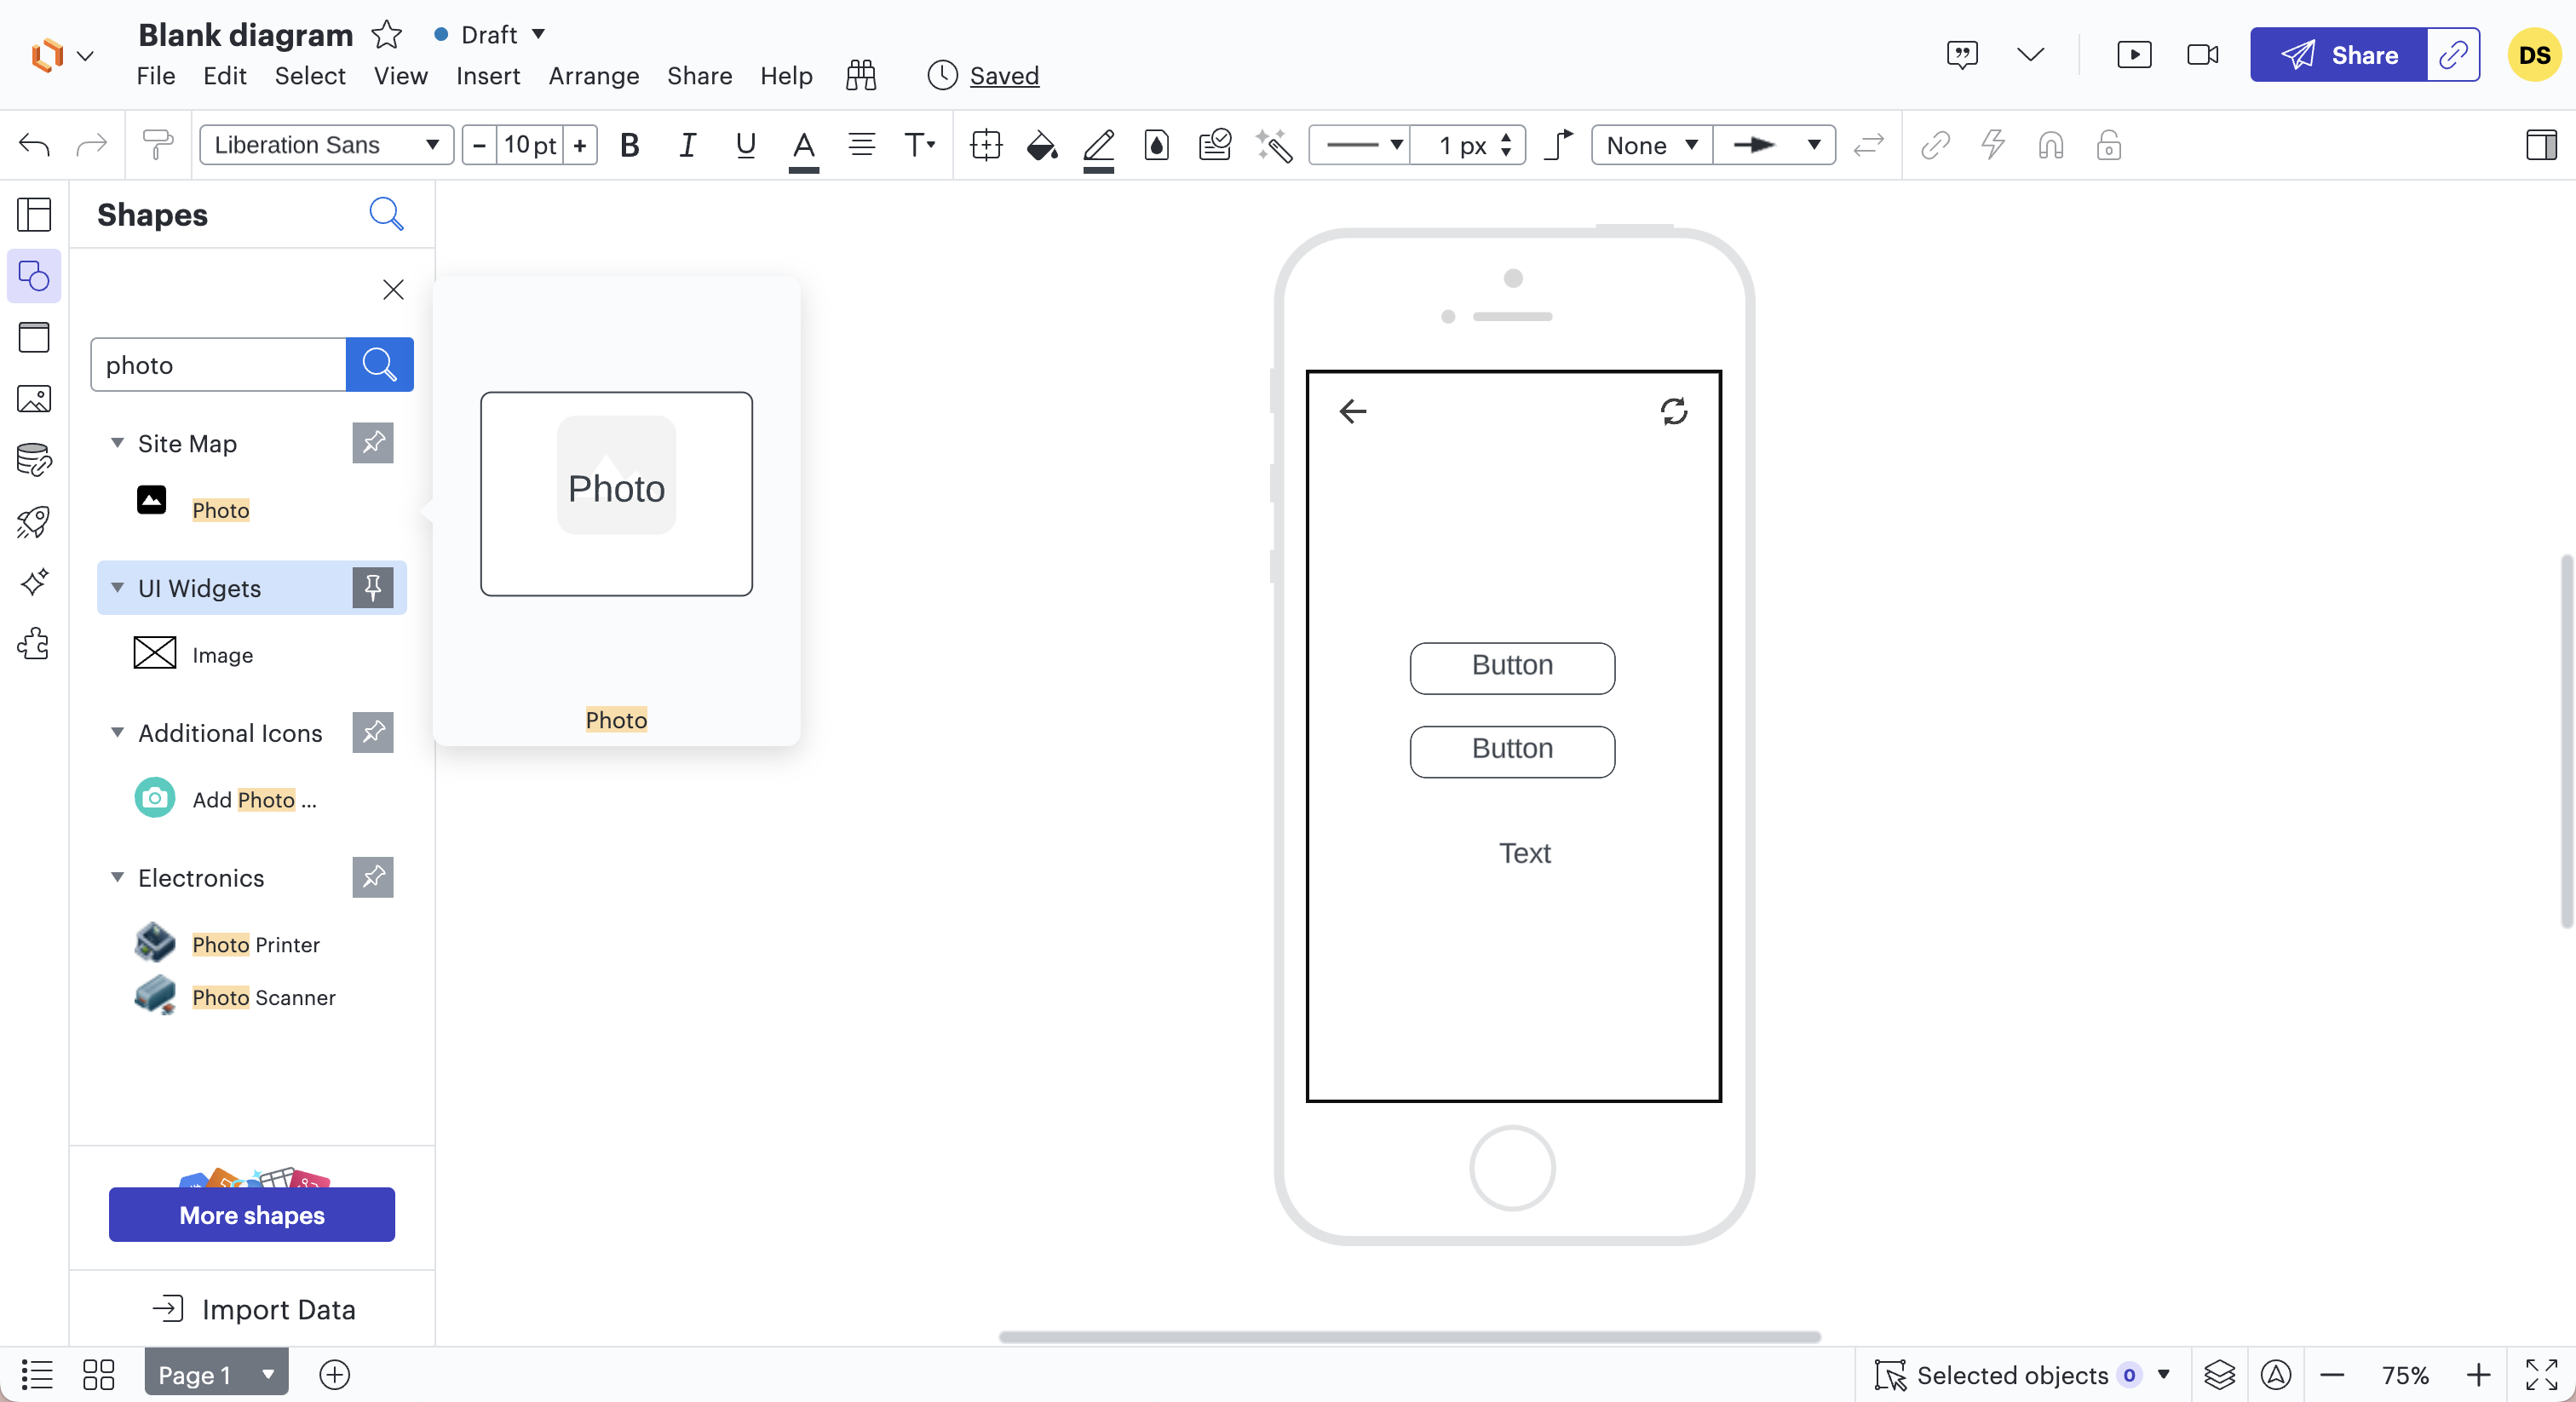
It is also possible to search for shapes or graphic elements using the magnifying glass.
In the case of Movedrop, we don't use additional illustrations because the screens are simple, and the purpose of the elements doesn't need to be specified.
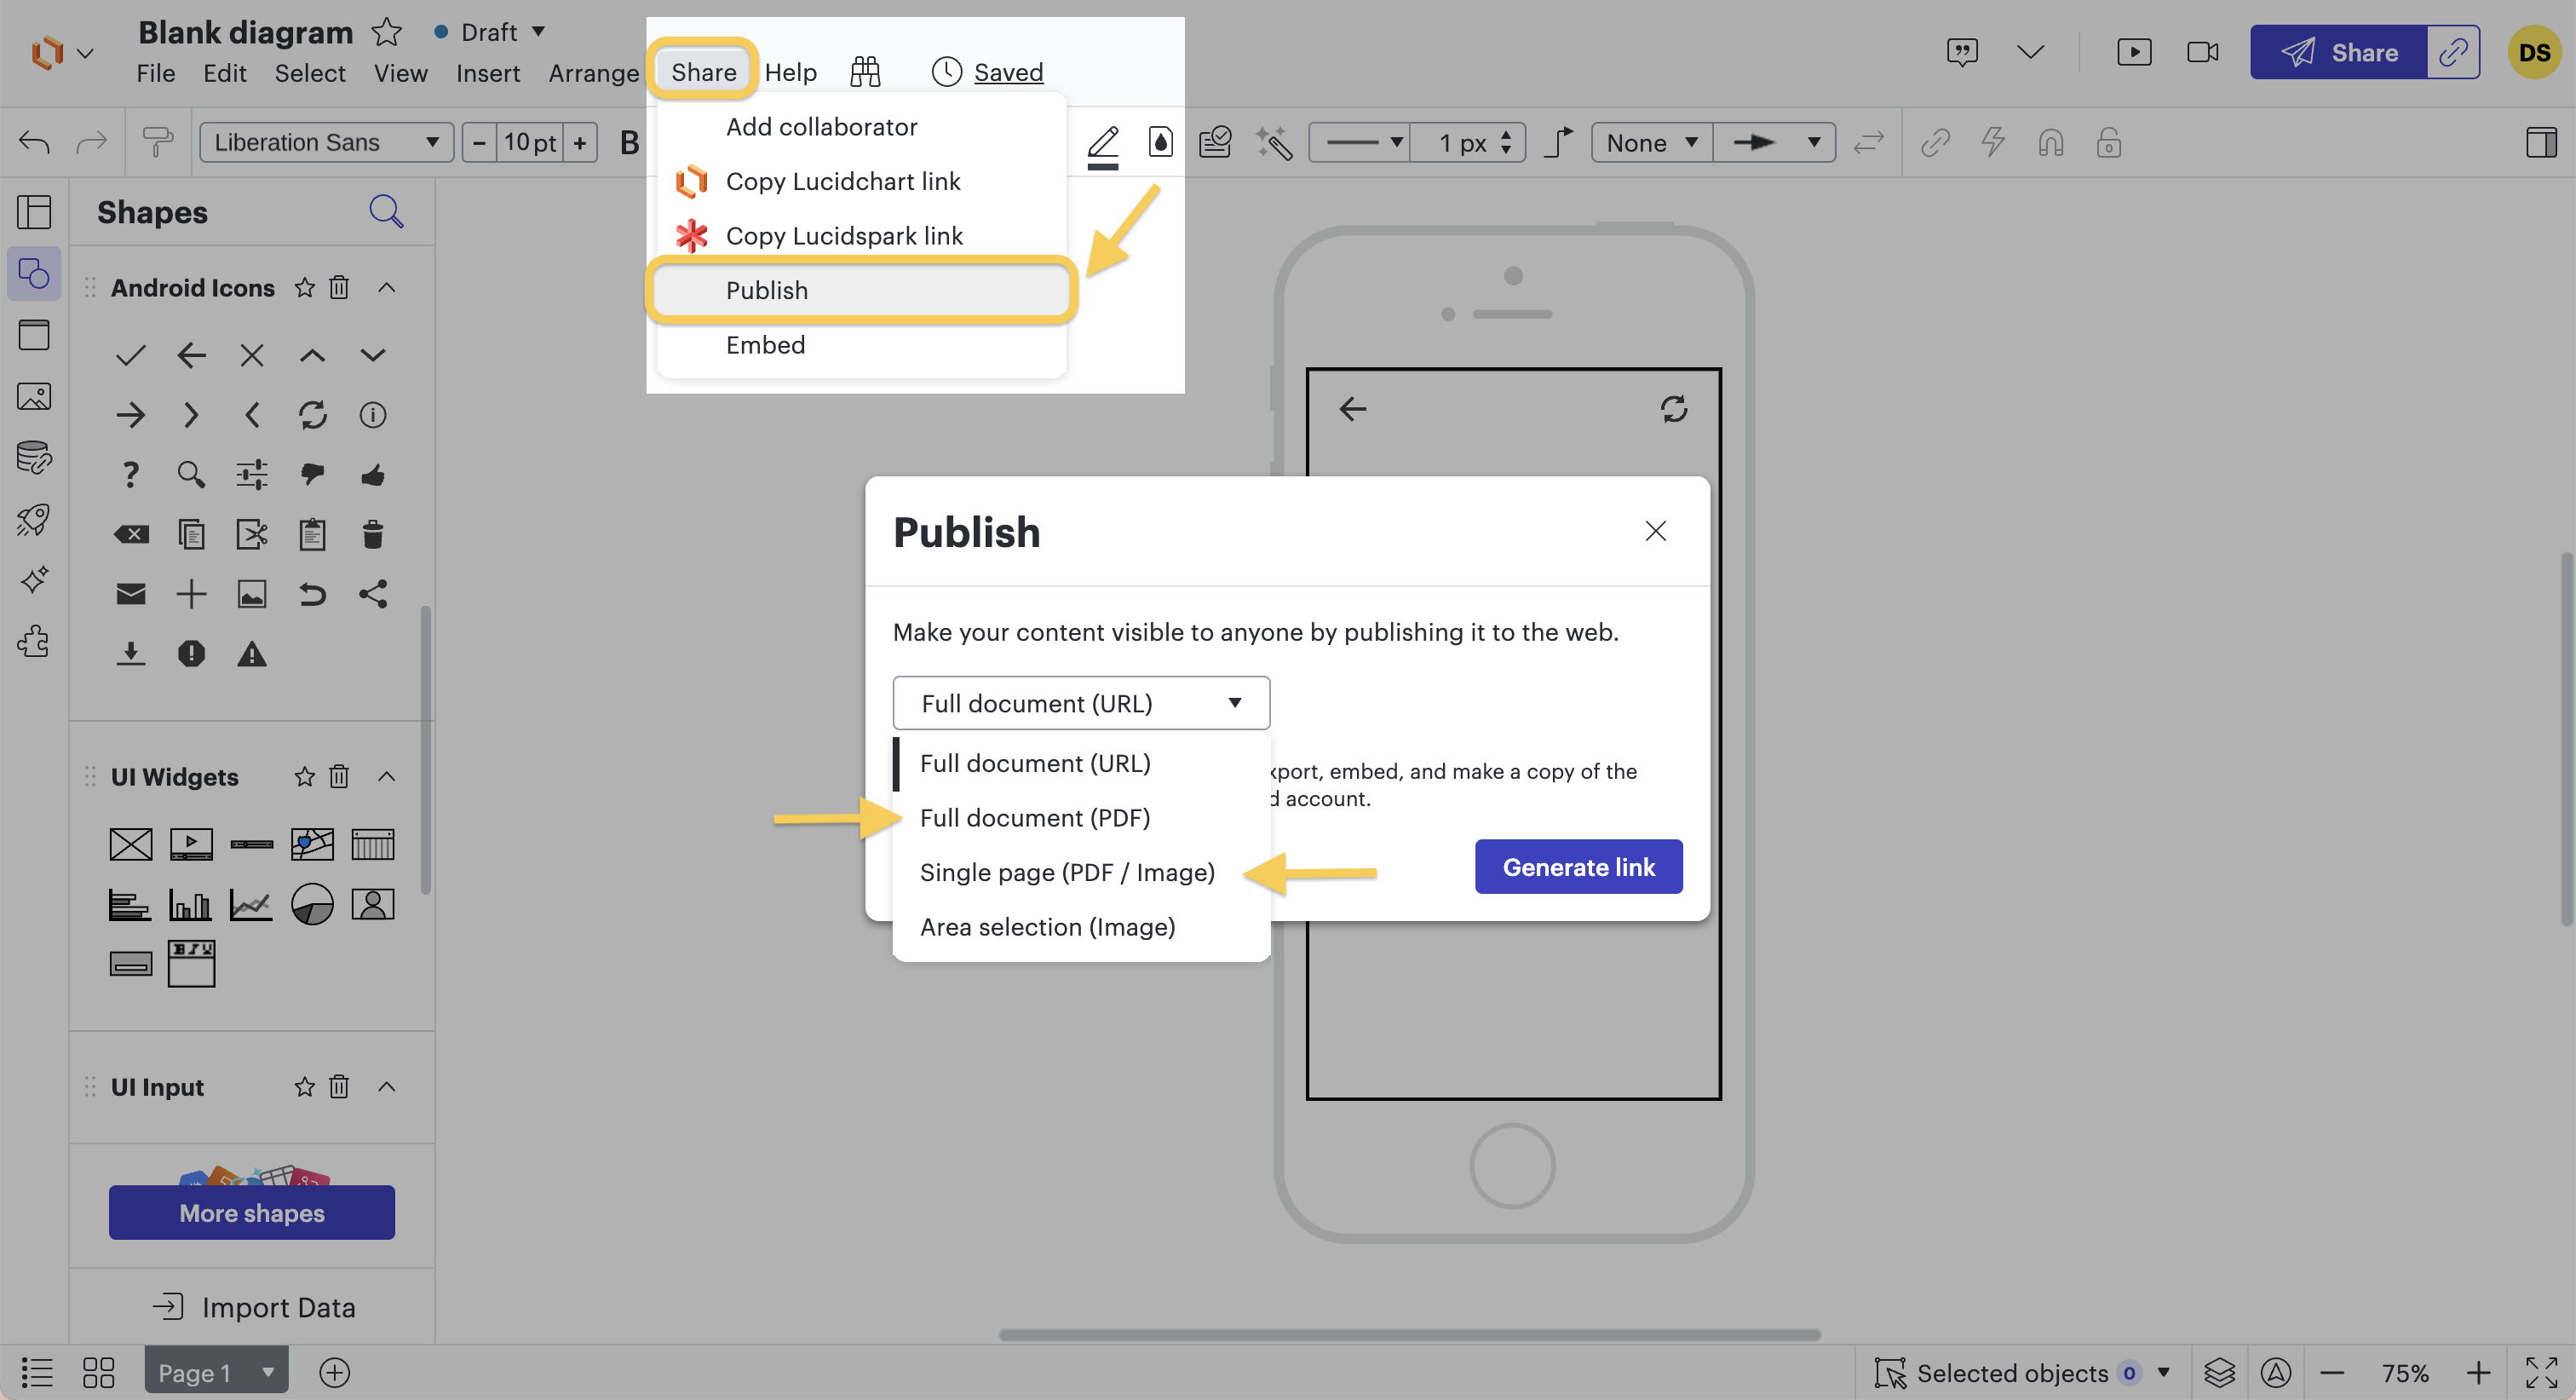
Step 6: Save and Use the Wireframe
Once our wireframe is ready, we can save and export it to present it to the client and then to the designer.
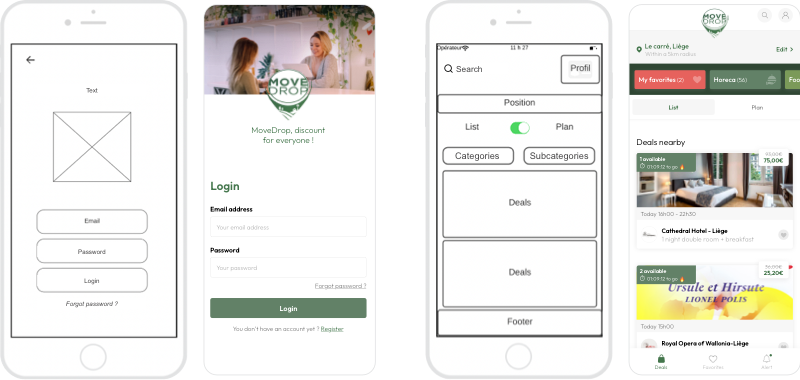
 If we compare the wireframe and the final design side by side, we see that the designer did indeed draw inspiration from the wireframe to build the application. Like with the website, this wireframing technique provides the designer with the general information needed to create the design (laying the foundation), while allowing room for creativity to go beyond the framework set by the wireframe.
#7.
Our advice
If it's your first time creating wireframes and you don't have a designer on your team, we recommend reaching out to a service provider with experience in the type of solution you want to develop.
Indeed, a mobile application has different specifications than a web application or management software. Verify whether the company you're approaching has previously worked on similar projects.
Even if you're working with professionals, don't hesitate to create some sketches of your future digital solution. These sketches will help the team better understand your expectations.
If you have any questions, leave us a comment, and we'll respond, or contact us directly.